The game
Everything you need to know before you step into the city
A complete tour of the rules of Omertane, from economy and buildings to combat, syndicates and the black market. Start with the beginner guide, then pick the section you care about.
In plain words
How it works, explained simply
Seven short explanations with numbers taken from the game rules. Each has an “In short” summary and a worked example you can redo with a pencil.
- How a fight is calculated
- How shields work
- Heat, the police pressure
- Respect or Terror
- The economy and the safehouse
- Convoys
- Syndicates
How a fight is calculated
Every soldier has an attack and a defence. The attacker’s power is the sum of the attacks of the troops sent, multiplied by luck and by the class bonus: each class hits certain classes 50% harder (see The army). The defender’s power is the sum of the defence of the troops left at home, plus the Wall and Capo bonuses, and between 22:00 and 07:00 it is multiplied by 1.5. If the attack does not beat the defence, the attacker loses everything it sent. If it does, it wins, but it loses a share too: troops × (loser’s power ÷ winner’s power)^1.5, at most 90%. The closer the score, the more the victory costs.
Example
100 Street knifemen (attack 10) hit 30 Street knifemen on defence (defence 14). Attack: 100 × 10 = 1,000, with no luck. Defence: 30 × 14 = 420 by day and 630 at night. The attacker wins either way. By day it loses 100 × (420 ÷ 1,000)^1.5, about 27 men. At night it loses 100 × (630 ÷ 1,000)^1.5, about 50. Luck could move those 1,000 attack points anywhere between 850 and 1,150. The convoy dialog does this arithmetic for you, with every factor on its own line.
How shields work
There are five kinds: the newcomer shield (72 hours from founding), the anti-harassment shield (5 days, after five lost defences in a row when your unprotected stock is under 5% of three times your depot capacity), the inventory shields (8 hours, 1 day, 3 days or 7 days), which stack on top of what you already have, the Law firm’s 4-hour Writ of Judicial Protection, and the golden Jubilee shield (12 hours, once a year on your account anniversary), which attacks cannot cancel. Occupied rackets never have a shield. If you attack a player while shielded you lose your shield, and the game asks you to confirm first.
Example
You still have a 5-day shield and want to use a 3-day one: the total would be 8 days, above the 7-day cap, so the game refuses. Once the active shield drops to 4 days or less, you can use the item.
Heat, the police pressure
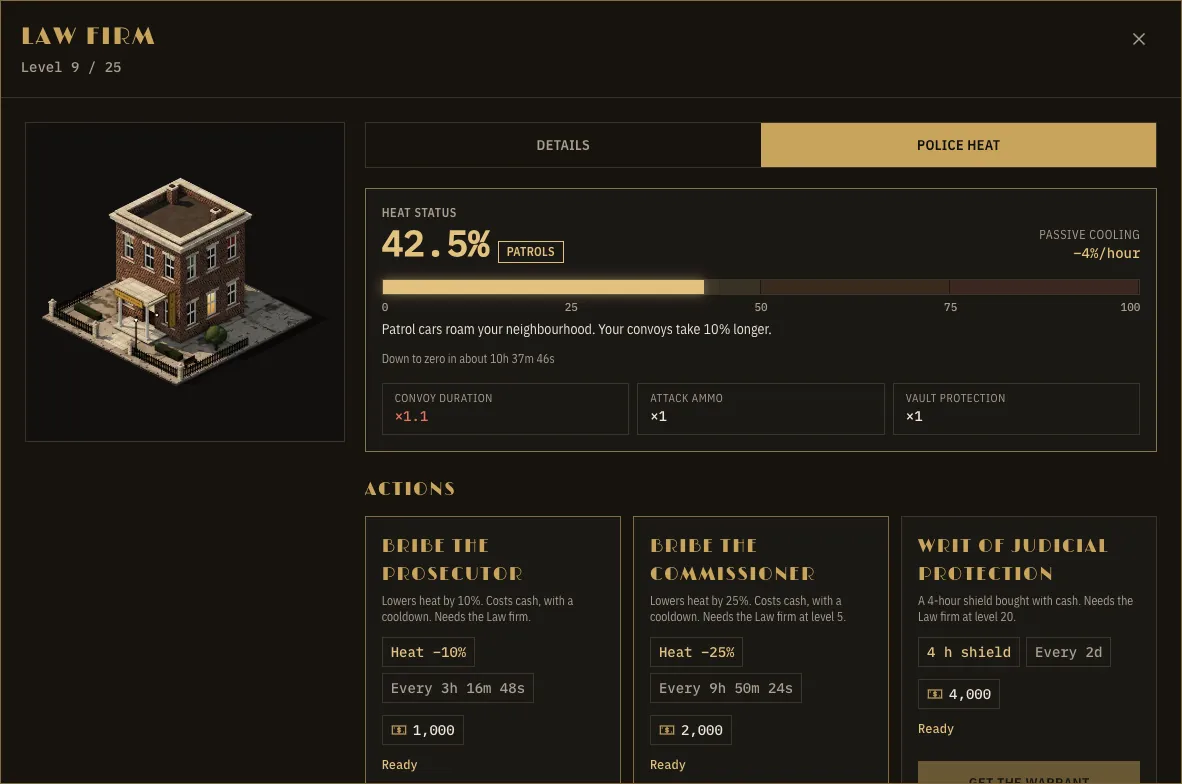
The meter runs from 0 to 100% and only rises when you strike: an attack on a compound adds 15% plus up to 10%, depending on how much the defender lost; a racket held by another player adds 15%, a gang racket 5%, and a strike on a Federal Transit 15%. Gathering and defending add nothing. From 25% your convoys are 10% slower, from 50% they are 20% slower and attacks on players cost 25% more ammunition, from 75% they are 30% slower and the safehouse protects less, and at 100% attacks on players are blocked and the raid arrives in 15 minutes. After every attack the meter holds still for 15 minutes, then falls 2% per hour (4% per hour with a level 9 Law firm). You bring it down faster by bribing the prosecutor (−10%, 1,000 cash) or the commissioner (−25%, 2,000 cash), or with Pass the Blame (−15%, you hand 20 Brawlers to the police).
Example
You send 100 men and the defender loses 40, dead or wounded: +15 + 10 × (40 ÷ 100) = +19%. Two such attacks put you at 38%, so your convoys are 10% slower. If you keep quiet you are back at 0 in 19 hours (about 10 hours with a level 9 Law firm), plus the 15-minute pause after an attack.
Respect or Terror
Towards Respect you are pushed by gathering at home (+0.5), reinforcing allies (+1), bribing the prosecutor (+1) or the commissioner (+2.5), and by calm: +0.5 per hour after 6 hours without an unprovoked attack. Towards Terror you are pushed by an attack on a compound or on a player-held racket (−2), a night raid (−2.5), heavy losses inflicted on the defender (−3) and Heat above 50% (−0.8 per hour). The perks grow in proportion to your position and peak at ±100. Respect: +12% production, faster healing and +10% to Brawlers. Terror: +10% attack for Gunmen and Machine gunners, +15% convoy carry, but 25% more Heat. An attack made under a vendetta does not push you towards Terror.
Example
At +50 Respect you have half the bonus: +6% production. At −100 Terror your convoys carry 15% more, but every attack adds 25% more Heat.
The economy and the safehouse
Production keeps running while you are away, but stops at the Central depot’s capacity: anything over is lost. The hidden safehouse protects 10% of every resource at level 1 and another 2% per level, up to 50% at level 21. An attacker steals only from the unprotected part, and only as much as its convoy can carry. Ammunition can never be stolen and is spent only on attacks against other players: one bullet for every 5 units sent. From 75% Heat the safehouse protects up to 20% less, a penalty a level 10 Law firm removes.
Example
The depot is level 11, so the safehouse protects 10% + 10 × 2% = 30%. Of 10,000 wood, 3,000 are safe and 7,000 can be stolen. An attack with 100 men costs 100 ÷ 5 = 20 bullets, or 25 from 50% Heat.
Convoys
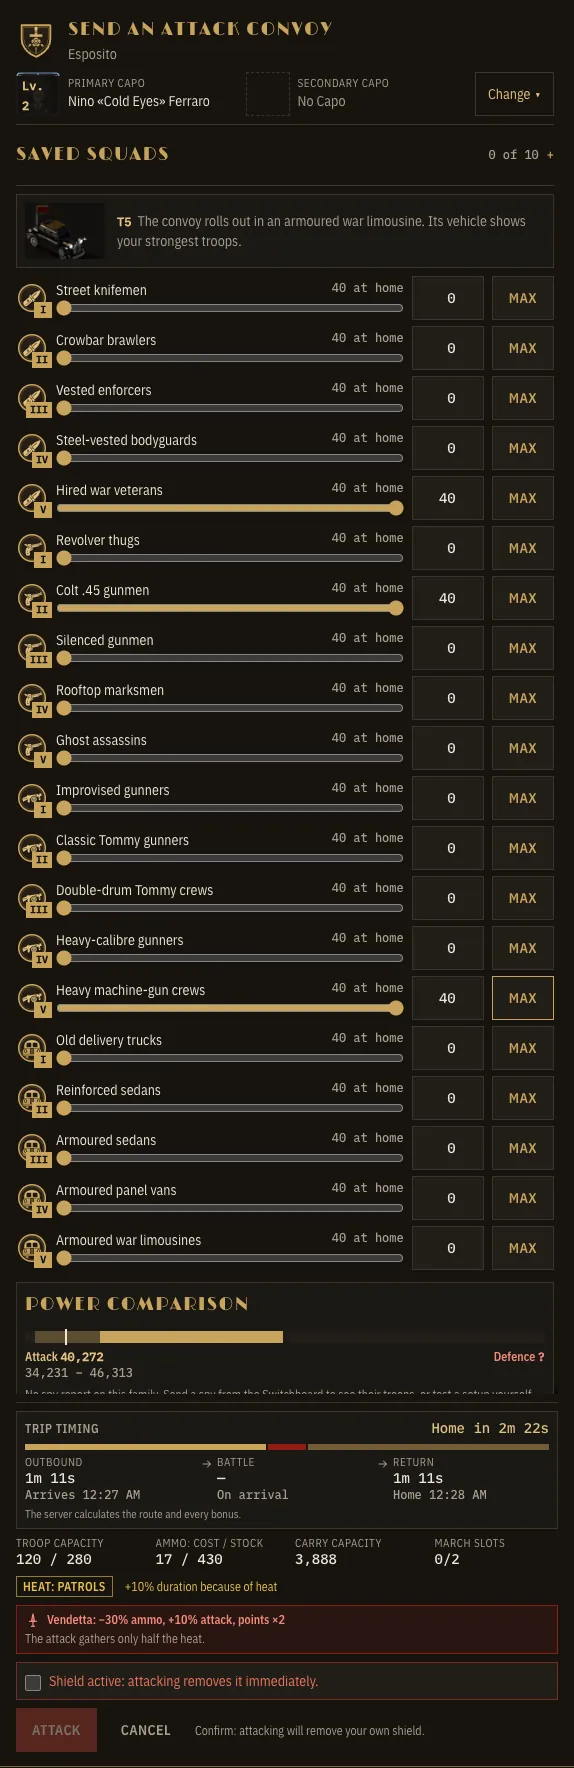
You pick the mission (gather, attack or reinforce), the troops and the Capo. Capacity is the sum of the troops’ load: a Street knifeman carries 10, a Gunman 6, a Machine gunner 8, an old utility vehicle 60. At a resource point the convoy gathers 25 × the point’s level per minute, at the normal pace, then drives home. Heat, boosters, the Garage and the Syndicate change the trip speed. A convoy can be recalled while it travels or works. Squads you use often can be saved under a name (up to 10): one click puts the same troops and Capos back in the window, trimmed to what is at home, free and within capacity.
Example
100 Street knifemen carry 100 × 10 = 1,000 units. At a level 3 point (25 × 3 = 75 per minute), loading takes 1,000 ÷ 75 ≈ 13 minutes 20 seconds, plus the round trip.
Syndicates
You build the Syndicate hall (Villa level 4), then found a syndicate for 1,000 gold, or join one with room or send a join request. Reinforcements are troops sent in a convoy to a colleague’s compound, where they defend it until you recall them. Every level of the hall lets you send 4% more troops in a reinforcement march and makes them 2% faster. Ranks run from Don to Soldier, and the leader can propose alliances or declare rivalries with other syndicates.
Example
At hall level 10 a reinforcement march carries 10 × 4% = 40% more troops than the usual convoy capacity and arrives 1.2 times faster (10 × 2% = +20% speed).
Economy
Four resources, each with its own job
Three resources are produced continuously and stored in the depot. The fourth, ammunition, is your reserve of action and only comes in instalments.
- Wood
- The food of construction. You get it from the Lumber mill and from points on the map, and every building upgrade, from level 1, costs wood.
- Iron
- Needed for every building upgrade from level 1, for all troops, from T1 to T5, and the big researches. It is the slowest resource to stockpile, so it is also the cheapest per upgrade. It comes from Metallurgy and from car junkyards.
- Cash
- Troop wages, research, hospital treatment, recruiting Capos and the priciest share of every building upgrade. It is produced by the Clubhouse, that is, bars, clubs and casinos.
- Ammo
- The single resource for attacks against other players and rackets. It regenerates one batch per hour in the Armory and cannot be stolen.
Basic rules
- Wood, iron and cash are produced every minute, even while you are offline, up to the Central depot’s capacity.
- Production and every duration run at the same pace for everybody, and the whole city shares one clock.
- A share of every resource sits safe in the depot’s hidden safehouse and cannot be plundered, from 10% at level 1 up to 50% from level 21.
- Resource points on the map run dry and respawn after 5 minutes, at another spot in the same neighbourhood.
- Passive production keeps the buildings moving, but the army and research are paid for mostly from what you bring in off the map: resource points and rackets.
The compound
Fifteen buildings behind the wall
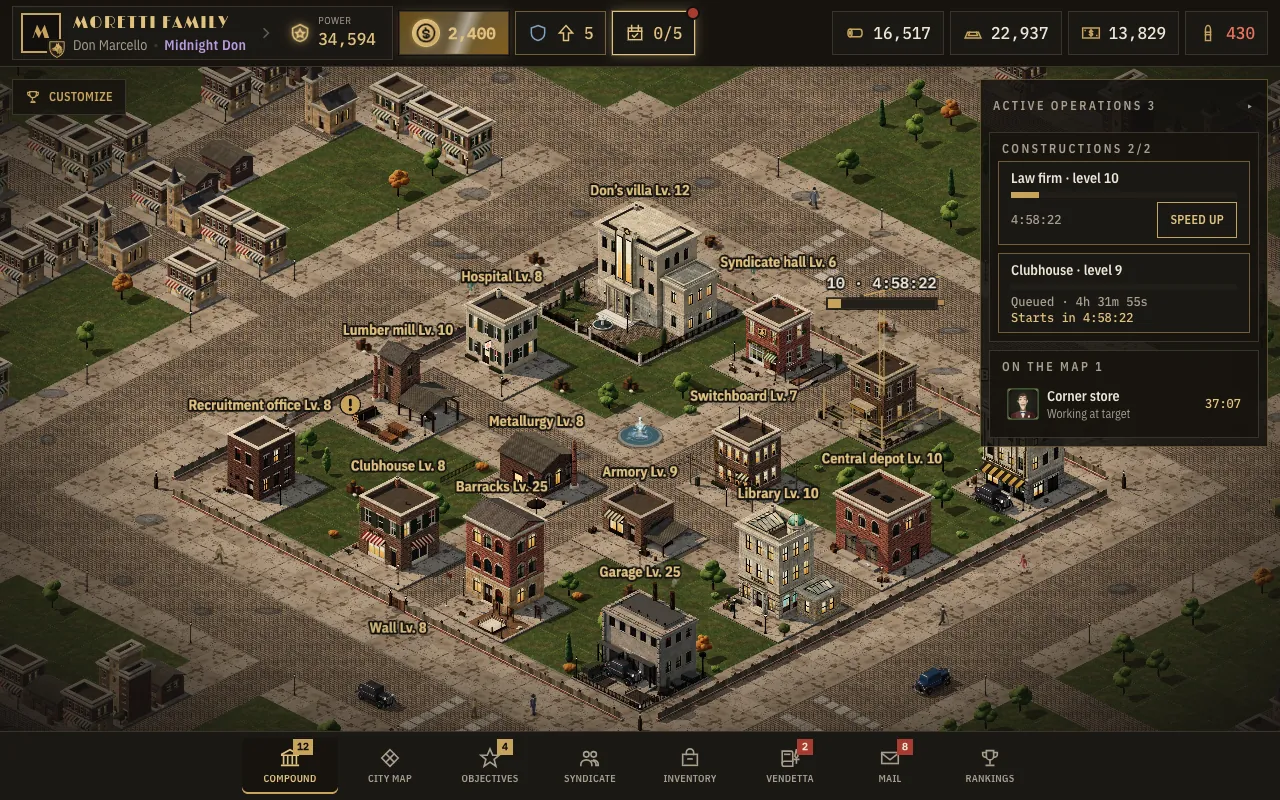
The compound is your private base and cannot be destroyed, demolished or deleted. Even when beaten you keep every building. Here are all fifteen, in their three looks: levels 1–9, 10–19 and 20–25. Next to them, the Black Market is a fixed shop that is always built and never upgrades.
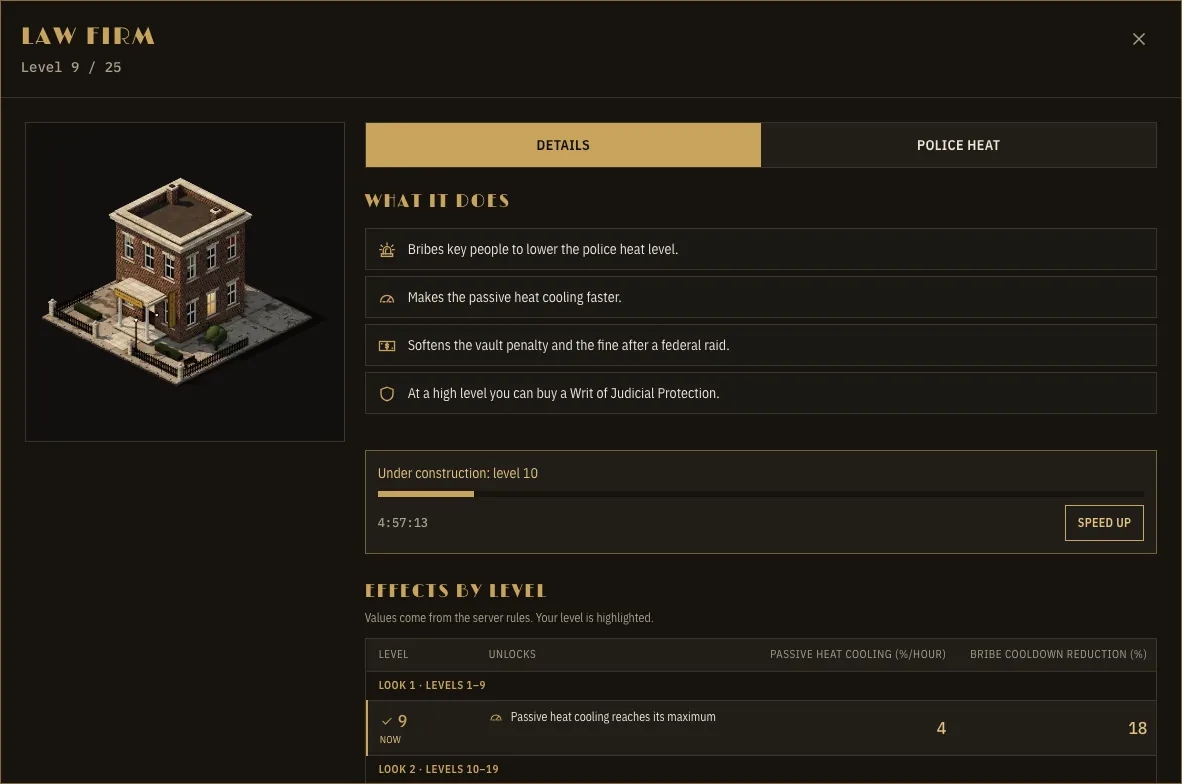
The window of every building
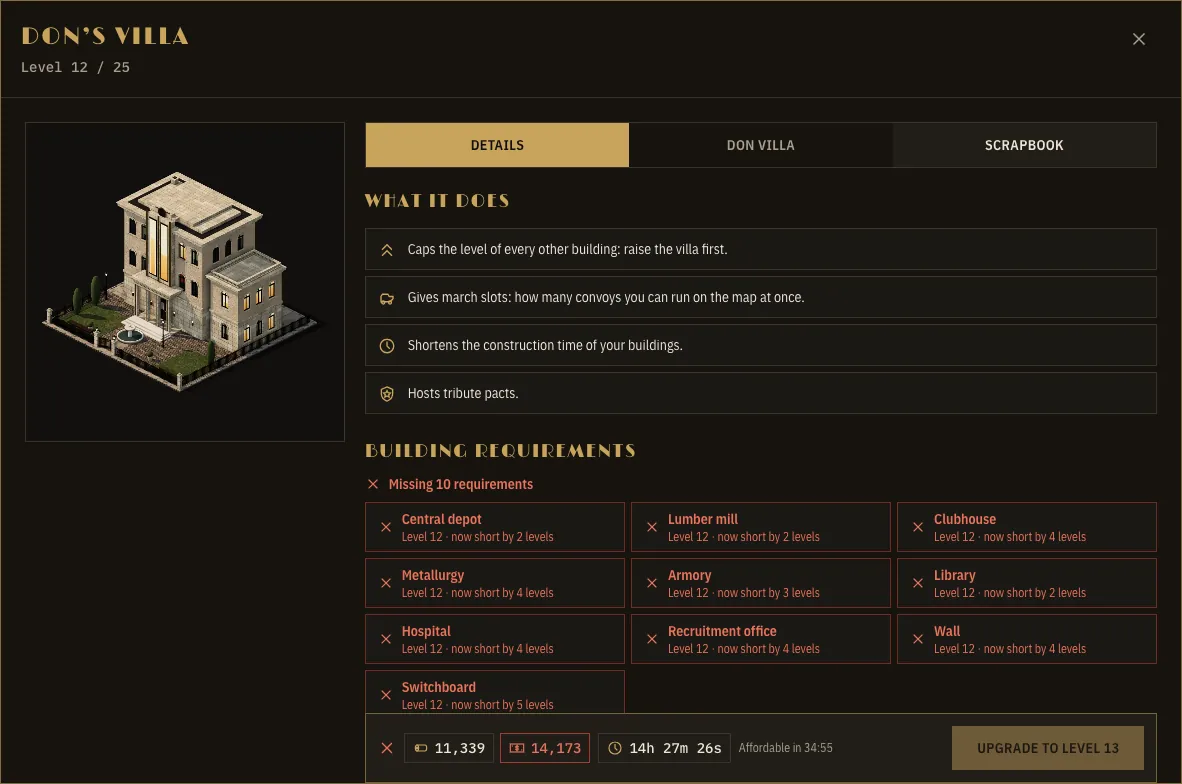
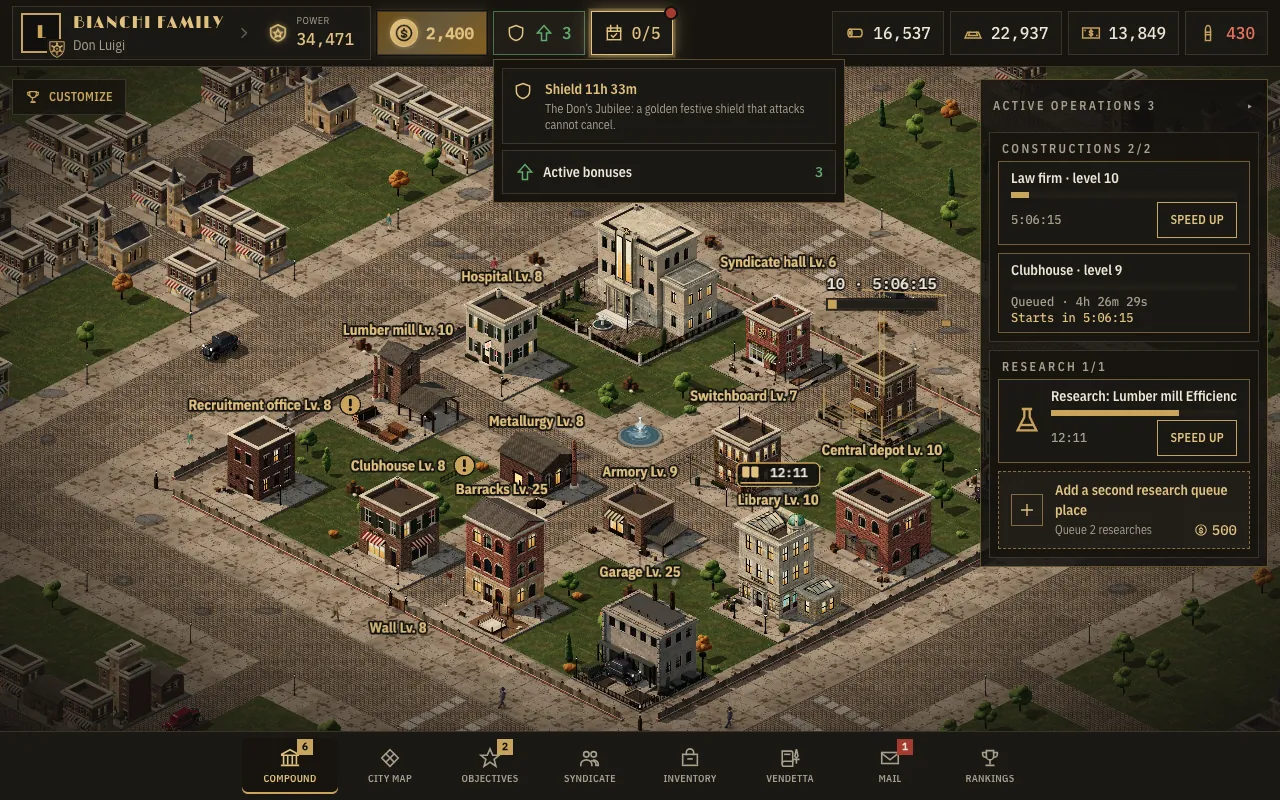
Click a building and its window opens. The Details tab shows what the building does, the progress of a running upgrade (under construction, with its Speed up button), the Building requirements with the level you have now, and the Effects by level table, with your level highlighted and the look it has at each stage. The Upgrade bar stays fixed at the bottom with the cost, the time and the upgrade button, so you never have to scroll to find it. At level 25 a green note tells you the building is fully developed. The second tab is specific to the building: troop training at the Barracks, research at the Library, healing at the hospital, the Respect or Terror gauge (Don villa tab) and the Scrapbook at the Villa, recruiting at the Recruitment office, the garrison at the Wall, the Club at the Clubhouse. Buildings without a specific part (depot, lumber mill, metallurgy, armory) only have the Details tab. On the map, every building carries its name and level, with a golden arrow when you can afford the upgrade. Only one window is open at a time: opening another one replaces the current one.

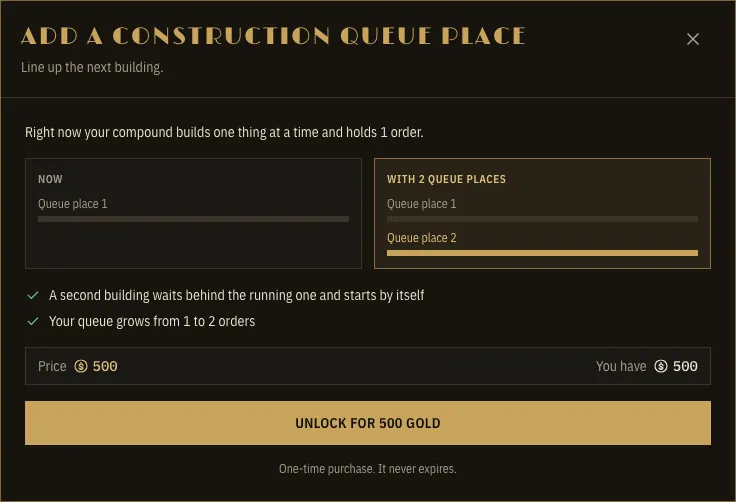
Only one order runs at a time in each queue, and orders are paid when placed. Construction, training (one queue shared by the Barracks and the Garage) and research each start with one place and can gain a second one for 500 gold, so no queue ever holds more than two orders. Extra places never run orders in parallel: they only hold the next orders, which start by themselves. The Villa caps every other building: none can go above its level. Running orders show a Speed up button, and Active operations groups constructions, training, research and healing in one place. A placed order cannot be cancelled.
Buildings advance together
No building gets left behind. Every level needs the Don’s villa at the same level or higher, plus other buildings: the Central depot and the three producers (Lumber mill, Metallurgy, Clubhouse) climb together, the Barracks need the producers at the same level, the Library, the Hospital and the Wall lean on the Barracks and the Clubhouse, and the Switchboard needs the Barracks at 60% and the Armory at 50% of its level. The Villa itself does not go up a level until every unlocked building has reached at least the Villa’s current level, the Switchboard included (once you unlock it at Villa level 5). Only the Law firm and the Garage may be 5 levels behind, and the optional Syndicate hall is never required. The Building requirements list in every building’s window shows the level you have now, and a click takes you to the building that is lagging.
How long it takes
Durations grow with the level: minutes at levels 2–3, hours around level 5, days after level 10 and weeks towards 25. Constructions run one at a time. Keeping all buildings level with the Villa, developer simulations put level 20 at about 100 days and level 25 at about 250 days, because only one building goes up at a time. A second queue place does not speed it up, it only keeps the next order ready so no time is lost. Research and troop training are long too: the researches that unlock T2–T5 troops take about 4 hours, 11 hours, a day and a half and three days, and need the matching buildings.
A second queue place
For 500 gold, paid once and kept for good, you add a second construction queue place. Buildings still go up one at a time, but the second order waits in line and starts the moment the first one finishes, so no time is lost while you are away.
Speed up
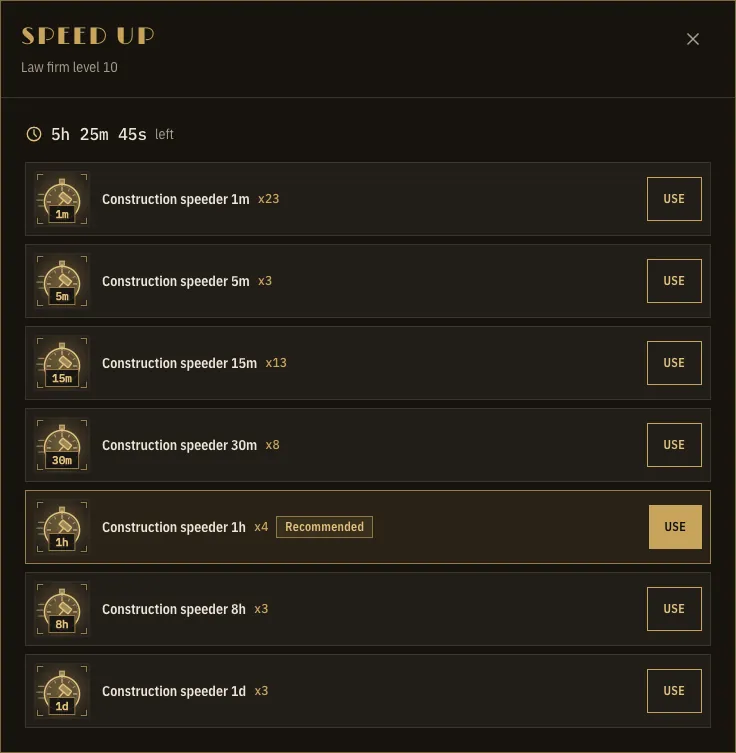
On every running order (construction, research and training) the Speed up button opens a dialog with the time left and the speeders in your inventory. The best fit is marked Recommended, and the game warns you before a speeder would be partly wasted.

Levels 1–9 
Levels 10–19 
Levels 20–25 Don’s villa
The heart of the family. It decides the maximum level of the other buildings and how many convoys can be out at once (from 1 to 4). Its Don villa tab shows your Respect or Terror gauge and the Scrapbook keeps the family photo album.
- Max level 25
- Starts built

Levels 1–9 
Levels 10–19 
Levels 20–25 Central depot
Storage for wood, iron and cash: 5,000 each at level 1, multiplied by 1.34 every level. A safehouse hidden inside it shields 10% of your resources from raids at level 1, plus 2% per level, up to 50%.
- Max level 25
- Built from scratch
- Needs Villa level 3

Levels 1–9 
Levels 10–19 
Levels 20–25 Lumber mill
Produces wood every minute, even offline: 1.8 per minute at level 1, 20% more with every level, up to 143.1 per minute at level 25, on top of a base income of 0.35. Production stops while your Central depot is full.
- Max level 25
- Starts built

Levels 1–9 
Levels 10–19 
Levels 20–25 Clubhouse
Bars, clubs and casinos that bring in cash continuously. Cash pays for troops, research and Capos.
- Max level 25
- Starts built

Levels 1–9 
Levels 10–19 
Levels 20–25 Metallurgy
Smelts iron every minute, even offline: 1.5 per minute at level 1, 20% more with every level, up to 119.2 per minute at level 25. Iron pays for the high building levels, vehicles and elite troops. Production stops while your Central depot is full.
- Max level 25
- Starts built

Levels 1–9 
Levels 10–19 
Levels 20–25 Armory
Regenerates bullets every hour (10 at level 1, up to 286 at level 25) and decides how many you can stockpile (100 at level 1, up to 7,950). Without it, you cannot attack players or rackets.
- Max level 25
- Built from scratch
- Needs Villa level 4

Levels 1–9 
Levels 10–19 
Levels 20–25 Barracks
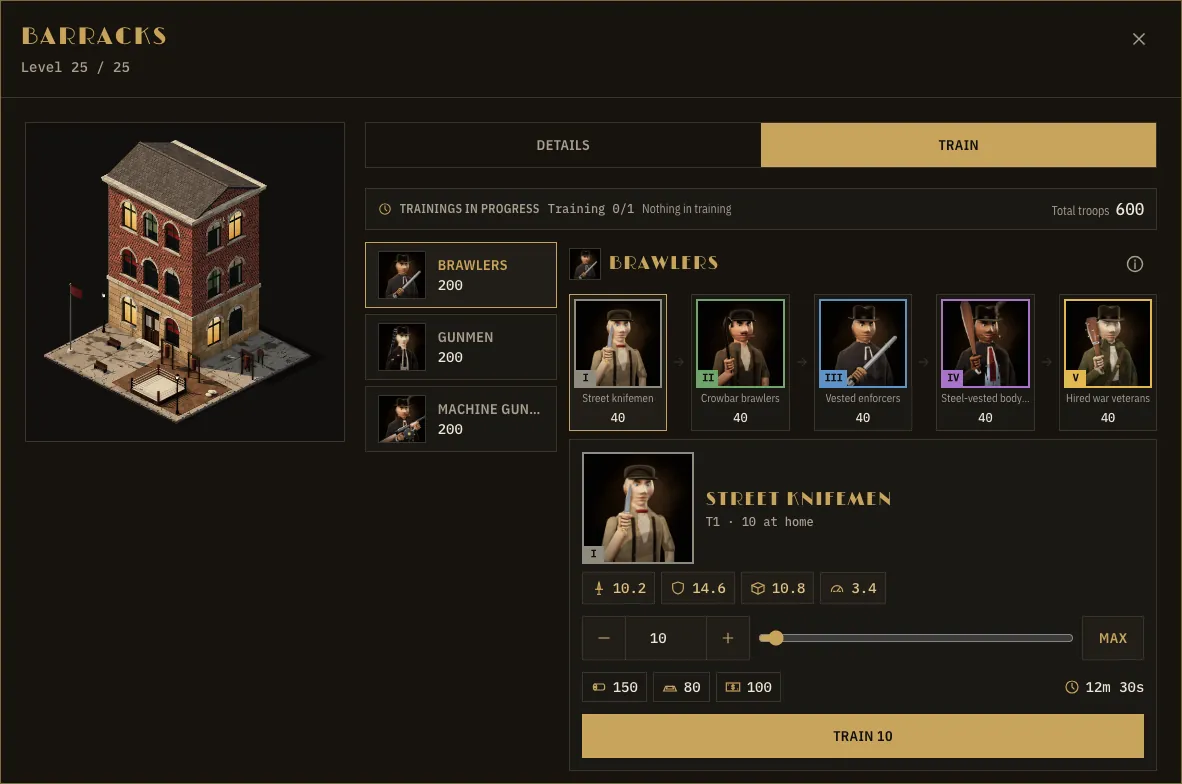
Trains infantry (brawlers, gunmen, machine gunners) from T1 to T5, one order at a time, with a second queue place unlocked for 500 gold to line up the next order. Its level increases the training batch and speeds up recruitment.
- Max level 25
- Built from scratch
- Needs Villa level 3

Levels 1–9 
Levels 10–19 
Levels 20–25 Garage
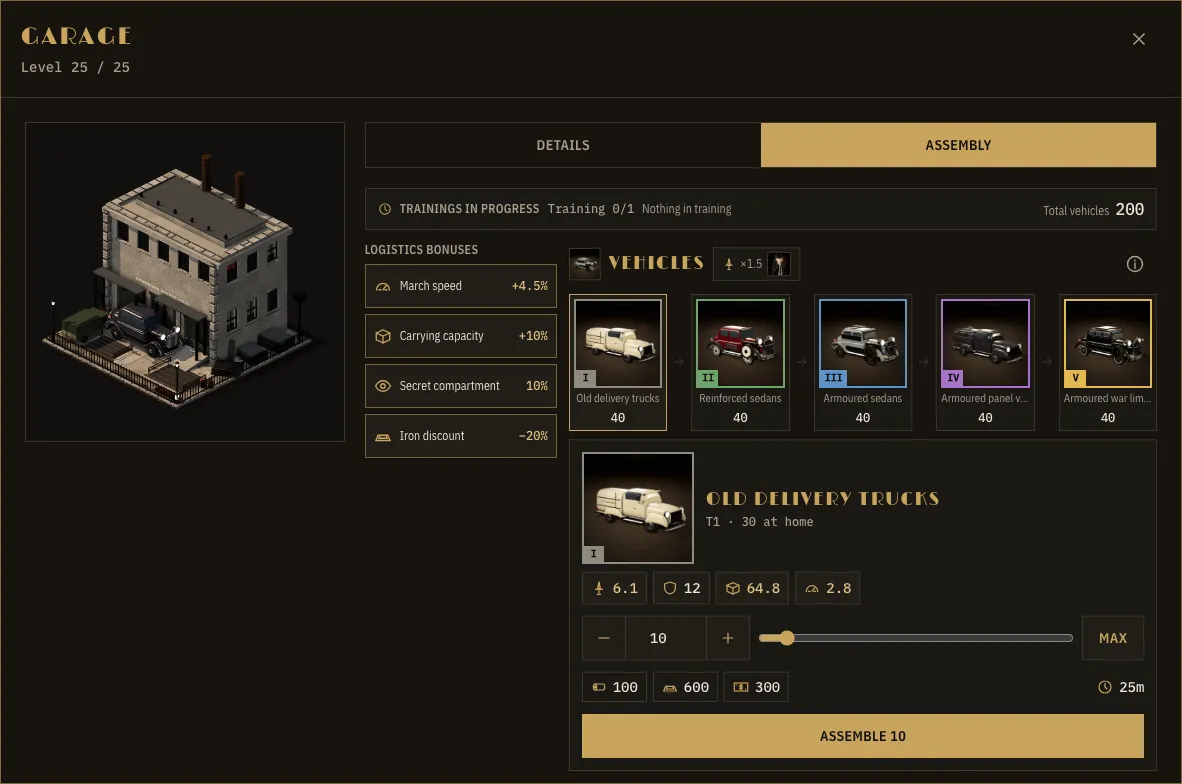
Assembles and coach-builds vehicles from T1 to T5, in the same training queue as the Barracks. Its level enlarges the assembly batch and adds logistics bonuses: speed for every convoy, carrying capacity, a secret compartment and iron savings.
- Max level 25
- Built from scratch
- Needs Villa level 4

Levels 1–9 
Levels 10–19 
Levels 20–25 Library
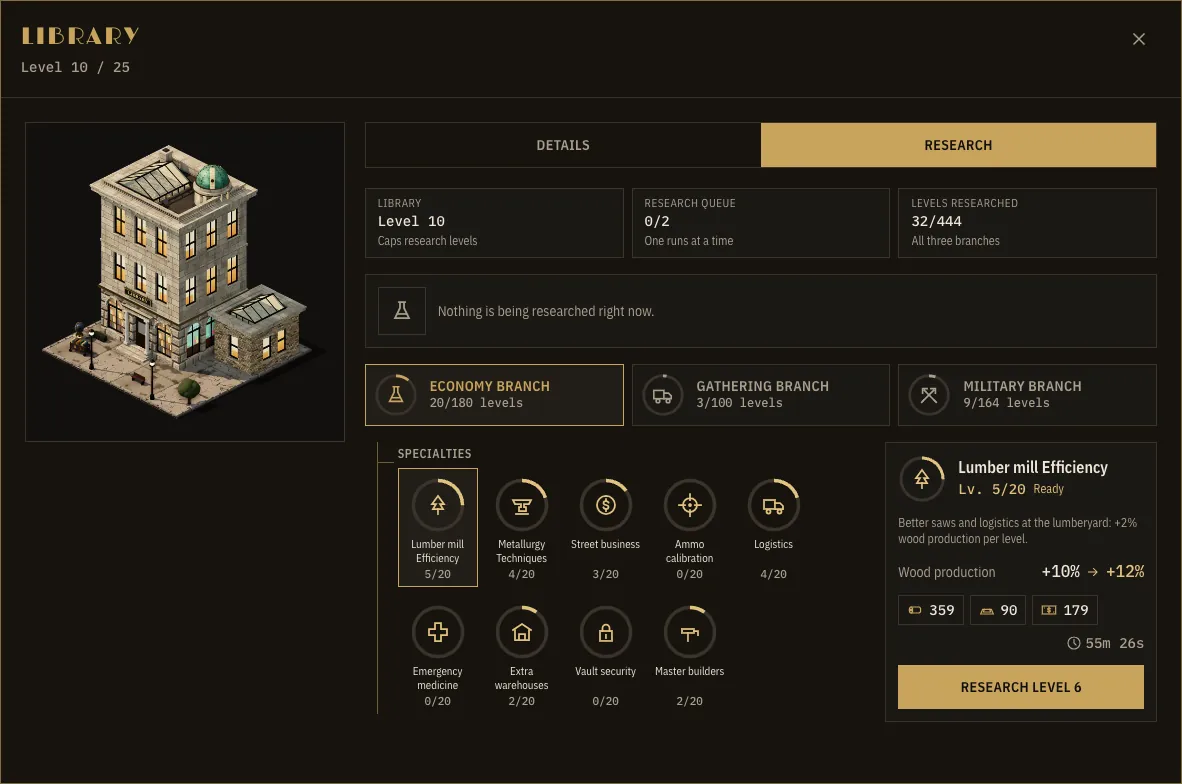
Unlocks the 26 economic, gathering and military researches, including T2–T5 troops. Its level caps the level of the researches.
- Max level 25
- Built from scratch
- Needs Villa level 5

Levels 1–9 
Levels 10–19 
Levels 20–25 Hospital
Heals soldiers wounded in battle. Its level sets how many beds you have for them.
- Max level 25
- Built from scratch
- Needs Villa level 4

Levels 1–9 
Levels 10–19 
Levels 20–25 Recruitment office
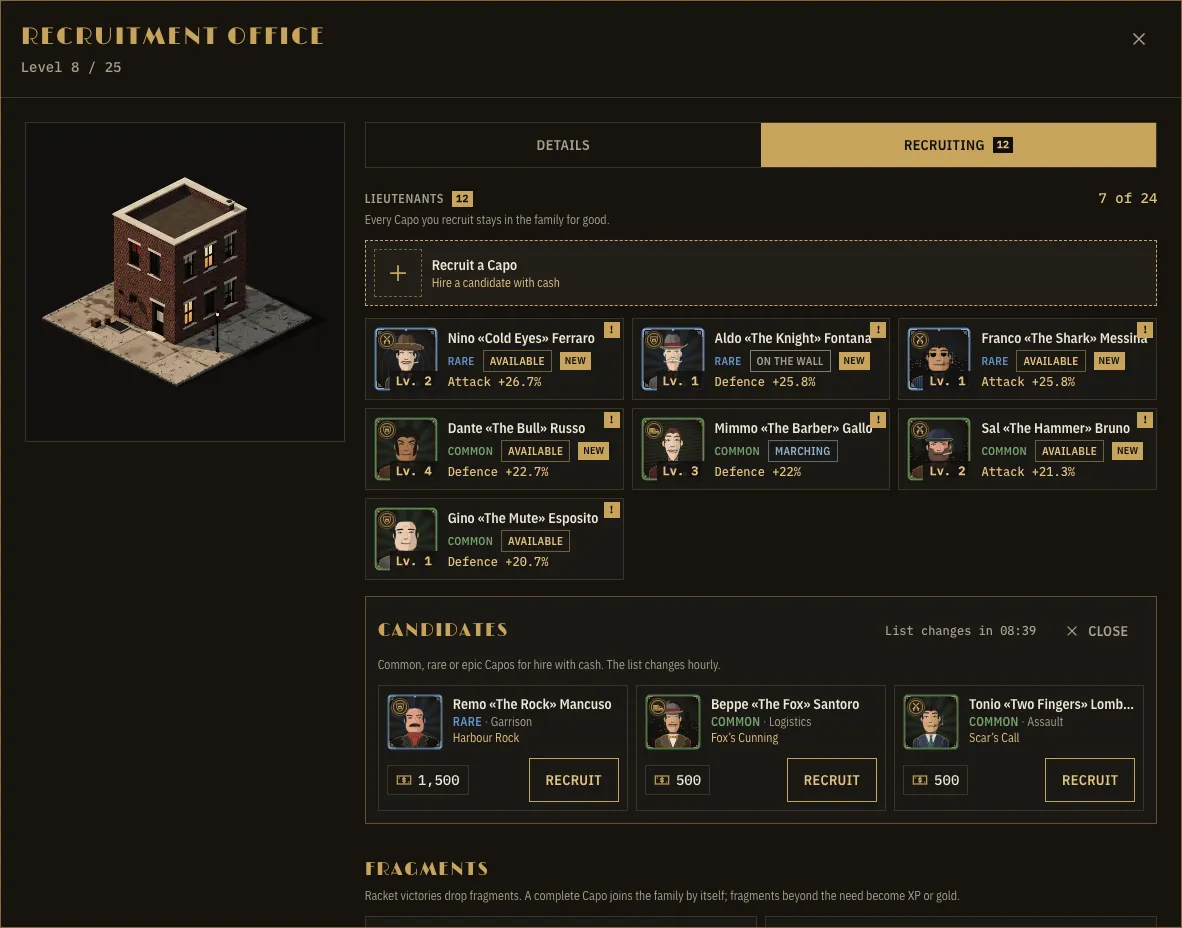
This is where you recruit new Capos with cash. The candidate list changes every hour, and the bar’s level raises how many candidates you are offered, from 3 to 5.
- Max level 25
- Built from scratch
- Needs Villa level 5

Levels 1–9 
Levels 10–19 
Levels 20–25 Law firm
Bribes the prosecutor (from level 1) and the commissioner (from 5), cools police heat faster and softens federal fines. From level 20 it buys a Writ of Judicial Protection, a 4-hour shield.
- Max level 25
- Built from scratch
- Needs Villa level 5

Levels 1–9 
Levels 10–19 
Levels 20–25 Syndicate hall
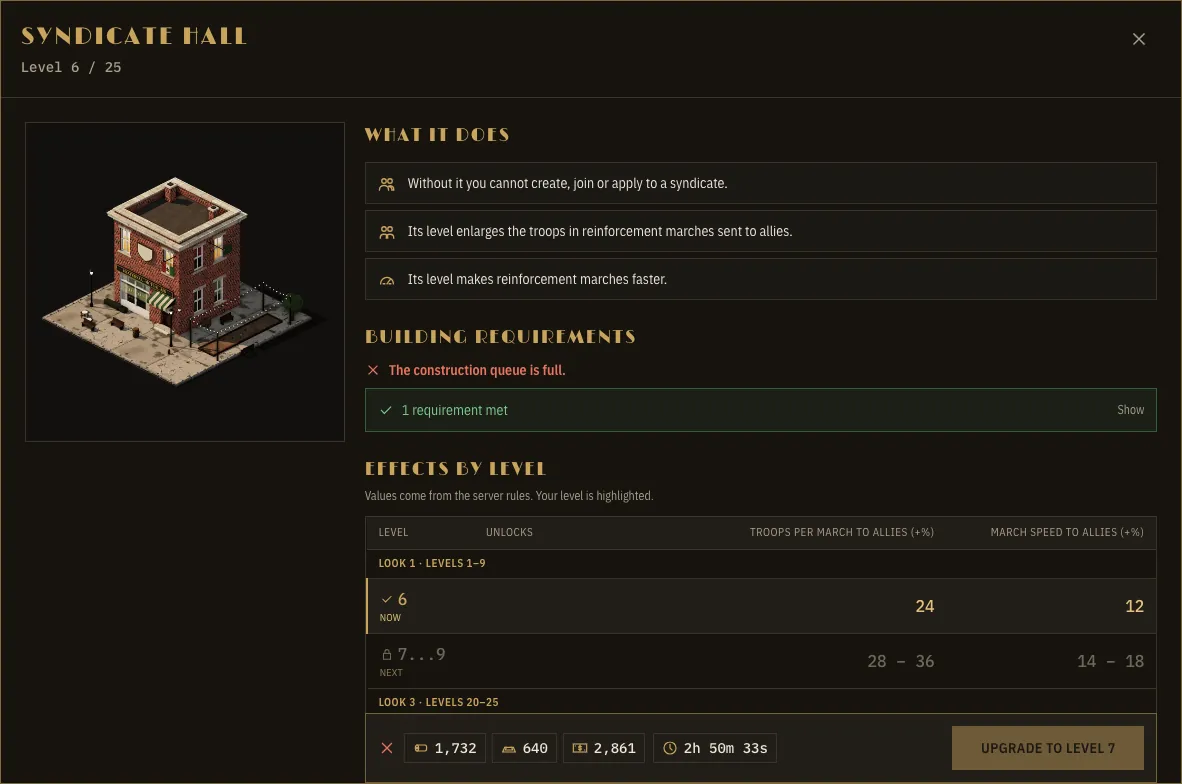
Required to found, join or apply to a syndicate. Each level enlarges the reinforcement marches you send to allies by 4% troops and speeds them up by 2%.
- Max level 25
- Built from scratch
- Needs Villa level 4

Levels 1–9 
Levels 10–19 
Levels 20–25 Switchboard
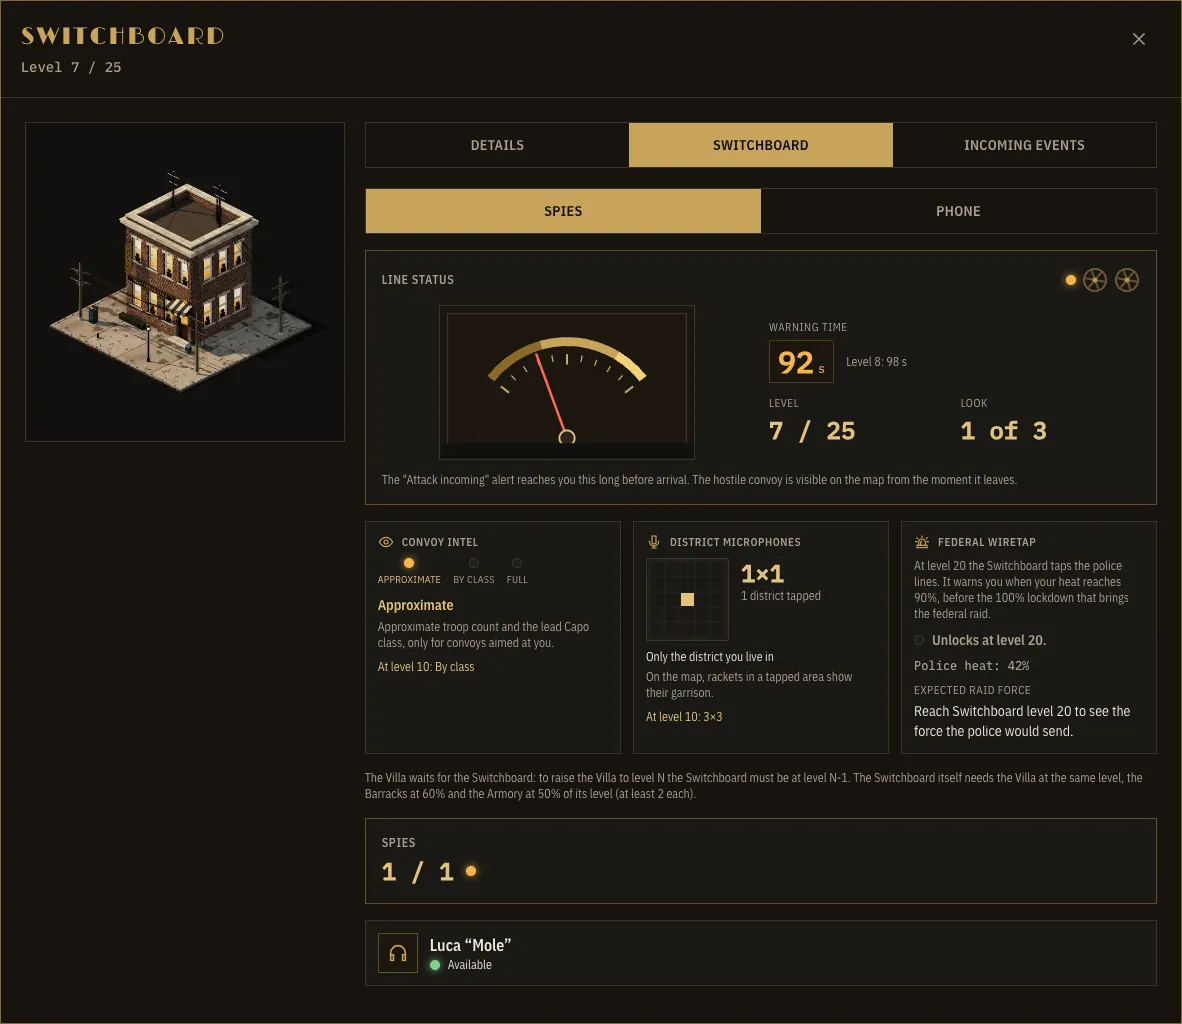
Early warning for incoming attacks, intel on enemy convoys, microphones on neighbourhood rackets and spies. From level 20 it also taps the federal police lines. It needs the Barracks at 60% and the Armory at 50% of its level.
- Max level 25
- Built from scratch
- Needs Villa level 5

Levels 1–9 
Levels 10–19 
Levels 20–25 Compound wall
Basic defence for the compound and the place where two Capos stand guard as a garrison.
- Max level 25
- Starts built
Map and neighbourhoods
The city you share with everyone else
The map has edges: the city grows in sectors, each a large square of neighbourhoods, with the sea beyond it, and it loads in pieces. Every piece of 25 × 25 lots is a neighbourhood with a name of its own, unique in the city.
Neighbourhoods, families and Masters
Compounds stand on fixed plots inside the neighbourhoods. When the open sectors are nearly full, a new one opens next to them, and the families that found or move into it get +25% production for 30 days. Nobody asks where you want to settle: the city puts you in the first neighbourhood with room, picked so you are not squeezed in next to too many neighbours.
The most powerful family in the neighbourhood becomes its Master. It wears a golden crown on the map and gets +10% on wood, iron and cash production while it holds the title. The title changes hands the moment someone overtakes you, and everyone involved gets a message.
You can move to a free plot in another neighbourhood, up to 100 tiles away (horizontal plus vertical distance), at least 24 hours after your last move and with one Forged passport. You cannot move while you have convoys out or an attack heading for you. You keep your buildings, resources and army.
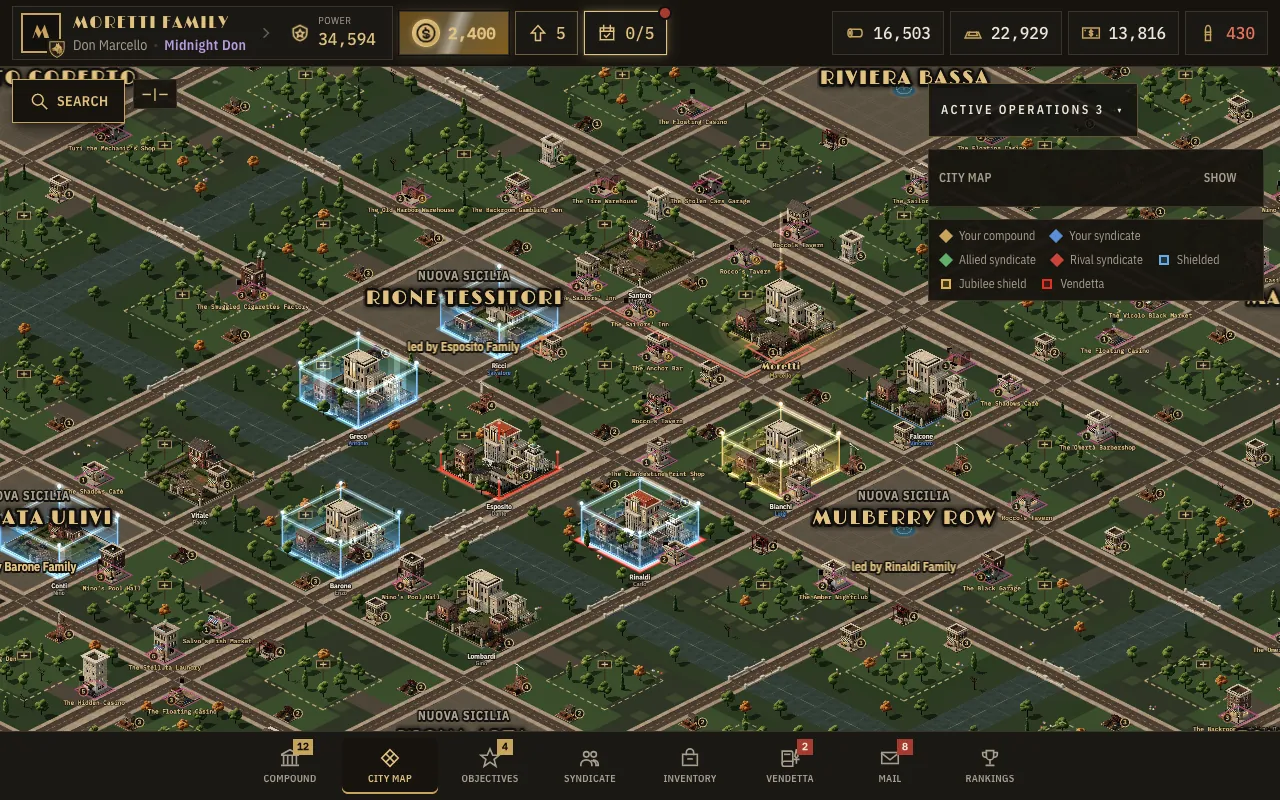
Every compound on the map grows with the level of its Don’s villa: a brick townhouse with a garage behind a picket fence, a villa with a red tiled roof surrounded by a barracks, a garage and a depot, a walled limestone estate that adds a laboratory, and finally a grand estate with a portico, a tower, a fountain and a cluster of larger buildings. Every lot has a single gate, and the convoys you send leave through it. Chimneys smoke, and at night the windows, lamps and headlights glow.
The map marks protection with a translucent blue force-field cube around the whole lot: that family is shielded. A gold cube is used only for the Don’s Jubilee shield. A red ring with short red posts marks a family on your Vendetta Ledger, drawn around the base of the cube when that family is also shielded. Your own compound has a soft gold glow instead of a cube, and a compound with no shield and no Vendetta has no overlay. The legend in the corner of the map lists the colours, and the map never shows how many families live in a neighbourhood.

Twenty-four lots in every neighbourhood
Resource points (15)
Five of wood, five of iron, five of cash, from level 1 to 5. You send a convoy that empties them up to its carrying capacity, then comes home. An emptied point vanishes and respawns 5 minutes later on another lot.
Rackets (9)
Businesses held by local gangs, from level 1 to 5: from the pool hall to the big nightclub. The garrison can be weak, average, strong or deadly. If you beat it, your surviving troops take over as the garrison and you occupy it for 2 hours, earning income every minute. You can hold only one racket at a time. A racket never has a shield: it can always be attacked, whether it is free or already held by another family.
On capture you instantly get 1,200 cash, 750 wood and 450 iron multiplied by the racket’s level. While you hold it, it brings in 15 cash, 10 wood and 8.4 iron per minute, multiplied by 1 + 0.15 × (level − 1): about 4,000 resources over the 2 hours at level 1 and about 6,400 at level 5, at the normal pace. On top of that, a win earns Capo XP (150 × the racket’s level) and fragments.
When the 2 hours are over, your troops come home and the racket goes back up for grabs. You can also recall them earlier, and what you have earned until then stays yours. Occupying brings income but does not protect your compound: it stays open to attack if it has no shield.
Convoys on the streets
Every troop movement is a convoy: sedans, trucks and vans driving along the city’s street network, with bridges over the river. The server works out the route and the map draws it in red, the travelled part solid and the rest dotted. The car turns at corners and rotates with the road.
Travel time is the length of the route multiplied by the speed of the slowest soldier in the convoy. The way back follows the same road. Before you send a convoy, a trip timing panel shows the outbound leg, the time at the target (gathering time or the moment of battle), the return leg and the total until the convoy is home, with the real clock times, all worked out by the server and updated as you change troops and Capos. You can recall a convoy while it travels or works, and it turns back from wherever it is. Sent an attack by mistake? In the first 60 seconds a Brake check brings the convoy back to the gate instantly: troops home, all bullets refunded, your shield restored and no Heat.
There are three missions: gathering (from a resource point), attacking (a racket or another compound) and reinforcing (troops sent to defend a syndicate mate’s compound). How many convoys you can have out at once depends on the Villa’s level: 1 slot at levels 1 to 7, 2 at 8 to 13, 3 at 14 to 19 and 4 at 20 to 25. The Communications research adds up to 2 more slots, but you never have more than 4.
The map has sound too: the city’s rumble, passing cars and horns. You turn it on or off with the speaker button in the top bar.

Plan the convoy before it leaves
Saved squads keep your favourite troop mixes and Capos one click away. The power comparison sets your attack against the defence factor by factor, with a verdict that already counts the luck range. The trip timing shows when the convoy arrives and when it is home again.
Nothing is spent until you press the button, so you can change the troops and the Capo and watch the comparison update.
The army
Four classes, five tiers
Infantry is trained in the Barracks and vehicles in the Garage, in batches: one order trains at a time across both buildings, in one shared training queue (a second queue place costs 500 gold). There are no starting troops: you build the Barracks, then recruit your men.
The classes

Brawlers
Tough and hard to take down. They hold the front line and soak up the hits. They do not stand up to automatic weapons.

Gunmen
The fastest on the map. They wreak havoc among brawlers, but vehicles run them over.

Tommy gunners
With the Tommy gun they wreck armour and brawlers. They move slowly and cost a lot, but they hit hard.

Vehicles
They haul huge amounts of cargo and are decisive over long distances. They lose to Tommy gunners.
Who beats whom
A counter brings a 50% attack bonus. Tommy guns beat brawlers and vehicles, gunmen beat brawlers, vehicles beat gunmen. An unbalanced army loses to a smaller but smarter one.
The five tiers
Each tier multiplies attack and defence by 1, 2, 4, 10 and 24, carries more and moves slightly faster. It costs more too, and iron is part of the price of every tier. To train T2–T5 you need the matching research and a Barracks (or a Garage, for vehicles) at level 5, 8, 12 and 16 respectively (Garage: 5, 10, 15 and 20). The unlock researches themselves need the Library at level 3, 6, 10 and 15. Once a tier is unlocked, troops from any lower tier of the same class can be upgraded into it: you only pay the difference in cost and time between the two tiers, in a single request per class, up to the maximum batch of the Barracks or the Garage, not all at once.
| Tier | Brawlers | Gunmen | Tommy gunners | Vehicles |
|---|---|---|---|---|
| T1 | Street knifemen | Revolver thugs | Improvised gunners | Old delivery trucks |
| T2 | Crowbar brawlers | Colt .45 gunmen | Classic Tommy gunners | Reinforced sedans |
| T3 | Vested enforcers | Silenced gunmen | Double-drum Tommy crews | Armoured sedans |
| T4 | Steel-vested bodyguards | Rooftop marksmen | Heavy-calibre gunners | Armoured panel vans |
| T5 | Hired war veterans | Ghost assassins | Heavy machine-gun crews | Armoured war limousines |
After the fight: the hospital
Of the troops lost in a fight, 40% die, 40% end up wounded and 20% walk away unhurt. The wounded go to the hospital as far as the beds allow; whoever has no bed dies. Healing costs 40% of the training price and takes 40% of the time, and the Emergency medicine research cuts it further.
The Garage: vehicles and logistics
Vehicles are no longer trained in the Barracks but assembled in the Garage, which shares the training queue with the Barracks: Villa level 4 unlocks it, T2 needs Garage 5, T3 needs 10, T4 needs 15 and T5 needs 20, plus the Library research. Iron is most of a vehicle’s price. The Garage also gives logistics bonuses to every convoy: up to level 9, +0.5% march speed per level; from level 10, up to +10% vehicle capacity and a secret compartment that brings 10% of the cargo home even if the convoy is wiped out; at level 20, assembly needs 20% less iron.
Research
The Library has 26 researches. The economic ones raise wood, iron and cash production, ammo regeneration, warehouse capacity and construction speed. The gathering ones make your convoys faster and heavier-laden and your rackets more profitable. The military ones unlock T2–T5 troops and give you attack, defence, speed, march slots and bigger batches. One research runs at a time; you can unlock two more queue places for 500 gold each to line up the next researches, which start by themselves.
Capos
The family’s lieutenants
Inspired by the commanders of classic strategy games, Capos are the people no army marches without. There are 24 of them, all fictional, all with a story.
Four rarities
The rarer the Capo, the more their talents, ability and power are multiplied: from ×1 to ×2.
Common
8 Capos
Rare
8 Capos
Epic
5 Capos
Legendary
3 Capos
Three roles

Assault
General attack, automatic weapons, march speed. For those who take the initiative.

Garrison
Compound defence, brawler resistance, fewer losses. The ones who stay home.

Logistics
Faster gathering, bigger loads, map speed. The ones who make convoys pay off.
How it works
- Levels 1–30: every level raises how many troops the Capo can command (200 plus 40 per level). XP comes from wins against local gangs, from gathering and from experience books bought with cash.
- Talents: one point every level, across three branches of 10 levels each. You can reset them any time, for cash, as long as the Capo is not out on a march.
- Ability and rage: in every fight the Capo builds up rage over 12 rounds. At 1,000 the ability triggers (an attack burst, a shield or a war cry). The secondary Capo follows right after the primary.
- Two Capos: the first gives passive talents and speed, the second only their ability and 50% of their capacity. Without at least one Capo, no convoy leaves.
- The garrison: two Capos that are not marching can stand at the Wall, and their garrison talents and abilities apply when the compound defends. A Capo on the Wall can be removed or switched for another available Capo in one step.
- No limit: you can own all 24 Capos and none can ever be dismissed. Your first two Capos, both Common, are free: one guards the Wall and the other is free to march. A freshly recruited Capo wears a New badge until you open its card.
How to get them
Your first two Capos are free: one is placed at the Wall from the start and the other is ready to gather and attack. At the Recruitment office you recruit with cash: 3 candidates (up to 5 at a high level), Common, Rare or Epic, who change every hour, for 500, 1,500 or 3,000 cash. You can unlock any of them from fragments too: every win over a racket drops Capo fragments, and when you collect enough (10 for Common, 20 for Rare, 40 for Epic, 80 for Legendary) the character joins you by itself. Capo boxes from your Inventory mostly give fragments of a Capo you do not own yet, with a small chance of a whole one, and never a Capo you already have. You can never hold more fragments than a Capo needs, and the fragments you hold cut the price of the whole Capo by up to 50%. For a Capo you already own, fragments become XP.
The full gallery
All 24 Capos, in order of rarity.
Legendary
 Don Amedeo «The Lion» Valenti
 Don Ottavio «The Patriarch» Santangelo
 Donna Violetta «The Queen» Carraro
Epic
 Rosa «The Black Widow» Moretti
 Gaetano «The Butcher» Ricci
 Massimo «The Wall» Pellegrino
 Ettore «The Banker» Rinaldi
 Bianca «The Countess» Sartori
Rare
 Nino «Cold Eyes» Ferraro
 Franco «The Shark» Messina
 Aldo «The Knight» Fontana
 Remo «The Rock» Mancuso
 Tullio «The Undertaker» Greco
 Orazio «The Professor» Lanza
 Cesare «The Notary» Bellini
 Ugo «Golden Hands» Palumbo
Common
 Sal «The Hammer» Bruno
 Tonio «Two Fingers» Lombardi
 Nunzio «Black Fist» Amato
 Gino «The Mute» Esposito
 Dante «The Bull» Russo
 Pino «Old Iron» Caputo
 Beppe «The Fox» Santoro
 Mimmo «The Barber» Gallo
Combat and shields
Rules of combat
A fight is resolved when the convoy arrives, instantly, on the server. There are no replays and no tricks: the same formulas for everyone.
How a fight is decided
Attack power is the sum of the troops times their attack, with the Capo’s bonuses and a luck factor between -15% and +15%. Defence power is the sum of the troops in the compound times their defence, plus the Wall’s defence, with the Capo’s bonuses and the night bonus. Whoever has more, wins. The loser loses everything it sent, while the winner loses a share proportional to how close the score was. Before you send anything, the convoy dialog compares the two armies for you: two opposing bars, a verdict (Clear win, Risky or Likely loss), the outcome at bad, average and good luck with the expected losses, and a factor-by-factor list for each side (troop attack, class counters, Capo talents and abilities, reputation, research, Vendetta bonus, Wall, night bonus, Defence booster). The numbers come from the same server formulas as the real fight, and the defence only uses what you are allowed to know: a gang racket’s garrison, a Transit truck’s guard or your latest spy report, with the factors a spy cannot see marked as hidden.
The Law firm
You build it from Villa level 5 and it gets you off the police’s back. At level 1 you can bribe the prosecutor, at 5 the commissioner, and at 20 you can ask for a protection warrant: a 4-hour shield for 4,000 cash, once every 48 hours. Every action has a cooldown that shrinks with level. The level also makes Heat fall faster by itself (4% per hour from level 9), cuts the fine of a lost raid to 10% instead of 25%, and from level 10 you automatically get 30% of the confiscated cash back.
The Switchboard
Without it you hear of an attack 45 seconds before it lands. With it you get 105 seconds at level 9, 240 at level 19 and 300 at level 25. You also get intel on hostile convoys: from level 1 the approximate troop count and the Capo’s class, from level 10 the troop classes too, from level 20 the exact composition. Microphones listen in on the rackets of your neighbourhood, and spies, each with a name of their own, 1, 2 or 3 by level, bring back a report on another player. From level 20 the federal wiretap warns you by mail and notification when your Heat reaches 90% and the police are preparing a raid, and the window shows the expected raid force, the number of federal agents and their power, which follows your troops and Wall. The Incoming events tab, next to the Details and Switchboard tabs, counts down to the next Federal Transit (12:00–18:00) and the next Neighbourhood Feast (18:00–00:00) and shows where they are. Feasts are not announced by mail. The office phone rings here too. The Switchboard needs the Barracks at 60% and the Armory at 50% of its level, and the Villa waits for it: for the Villa to reach level N the Switchboard must be at N−1.
Shields
Newcomer shield: 72 hours
Every new compound is protected for 72 hours from its founding. If you attack while shielded, you drop your own shield, and the game asks for confirmation first.
Anti-harassment shield: 5 days
If you lose five defences in a row and are left with almost nothing to steal (under 5% of three times your depot capacity), the family gets a 5-day shield. It is a safety net, not an excuse to stop defending.
Inventory shields
Shields of 8 hours, 1 day, 3 days or 7 days stack on top of the current shield, up to 7 days in total. You earn them from achievements and the club, or buy them with gold at the Black Market.
Writ of Judicial Protection: 4 hours
From Law firm level 20 you can buy a 4-hour shield for 4,000 cash, once every 48 hours. It is refused if you already have a longer shield.
The Don’s Jubilee shield: 12 hours
Once a year, the first time you enter the game after the anniversary of your account, the family throws a Jubilee: a golden festive shield for the first 12 hours. Attacks cannot cancel it, not even the ones you launch yourself, and it never counts towards the 7-day cap of your other shields.
The loot and its limits
- A compound is never destroyed, conquered or removed from the map.
- A winning attacker steals from the defender’s unprotected stock (not the share hidden in the safehouse), up to carrying capacity.
- Bullets can never be stolen.
- The defender gets the alarm 45 seconds before the attack arrives. The Switchboard extends the warning up to 5 minutes.
- Attacks on gangs (NPCs) spend bullets just like attacks on players.
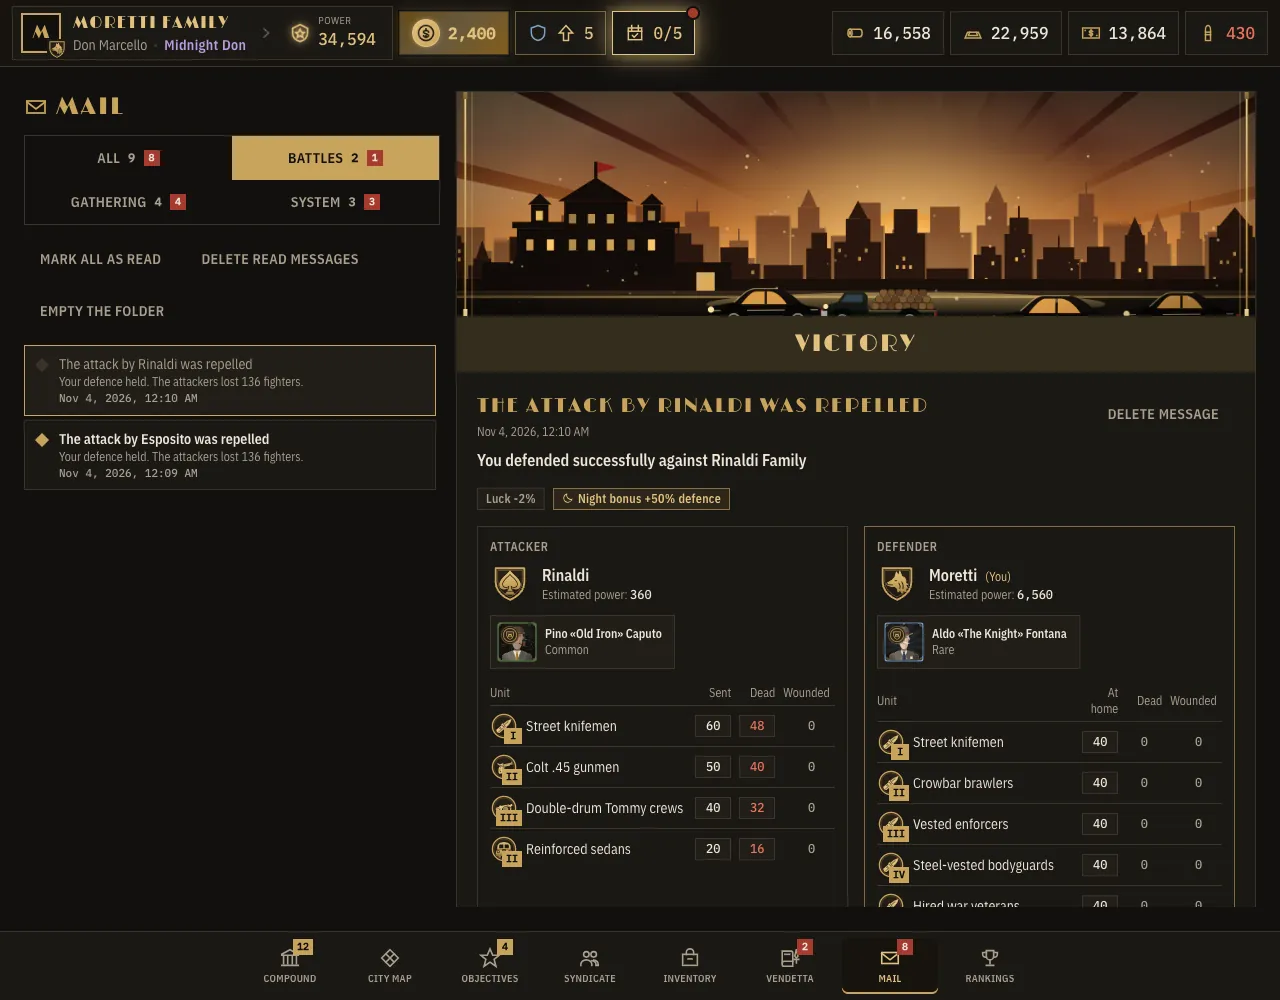
Mail: battle reports
Every fight and every gathering run ends with a message in Mail: who won, which troops were sent, how many died, how many were wounded, the luck roll, the Capo abilities, the loot and the XP. Each battle report also has a timeline (convoy dispatched, arrived, night bonus, the 12 rounds, the decisive result, losses, loot, Capo rewards and the return home) and a “Why these losses” section that shows how both powers were built, how much the winner lost and how your troops split into dead, wounded and survivors. Messages are filtered by category (Battles, Gathering, System), have an unread counter, and the read ones can be deleted. Back after 30 minutes or more offline, one activity report mail sums up what happened, in four sections (Economy, Operations, Underworld, Threats), with a button to the relevant screen and a red block for anything urgent.
Rankings
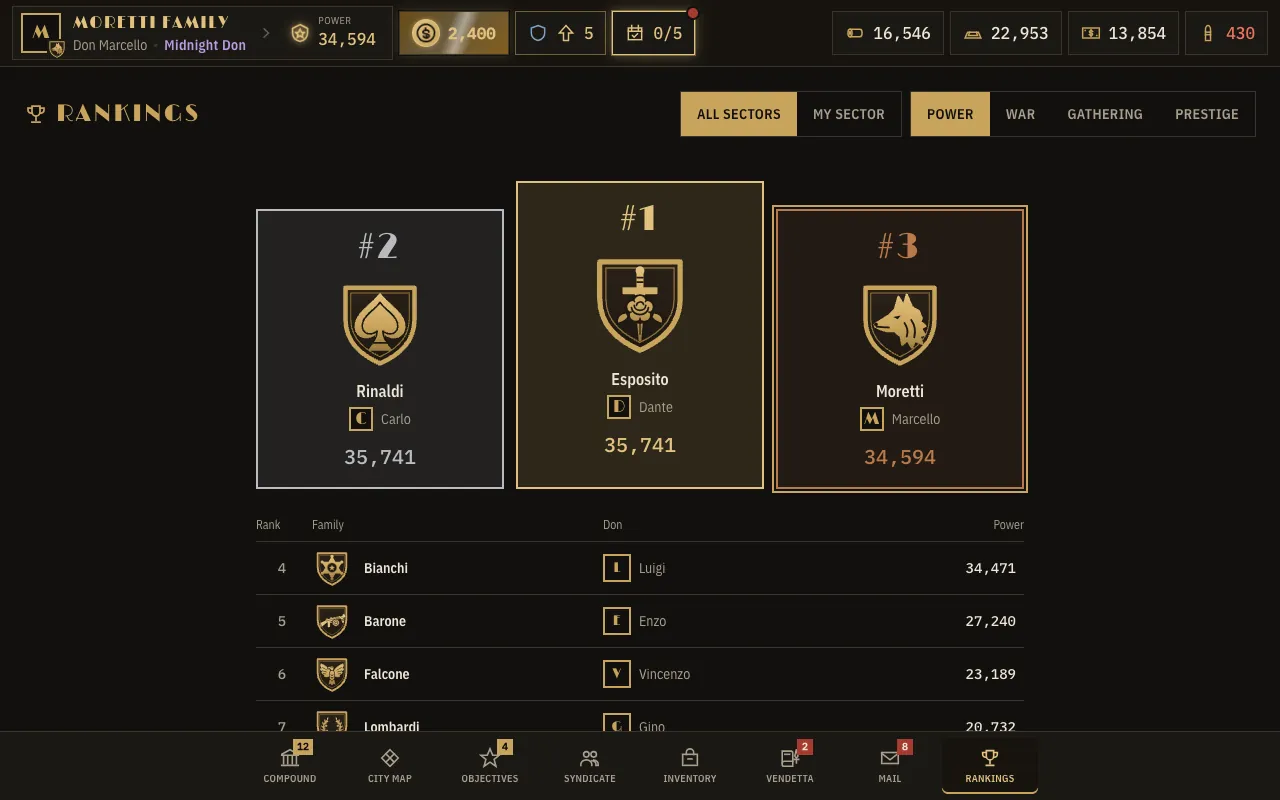
Four tops, four ways to be a Don
The whole city shares the rankings. Each page lists 25 families, with crest, Don and value.
Power
The sum of building power, technology, troops (1, 2, 4, 10 and 24 points per T1–T5 unit) and Capos. Buildings and technology stay, troops can vanish.
War
Points for every enemy unit wounded or killed, weighted by its tier. You earn them in any fight, against gangs or players.
Gathering
The total of wood, iron and cash delivered to your depot by your gathering convoys, after the depot capacity cap.
Prestige
Earned by striking names from the Vendetta Ledger, the more the stronger the opponent you hit. Only families with more than zero prestige appear in the ranking.
Objectives and inventory
Every job done pays off
The Objectives tab has two tabs: the Daily Newspaper, with the missions of the day and the news of the last 24 hours, and Achievements, for those who go far. What you earn lands in your depot, in your inventory and, sometimes, in the gold purse.
Daily Newspaper
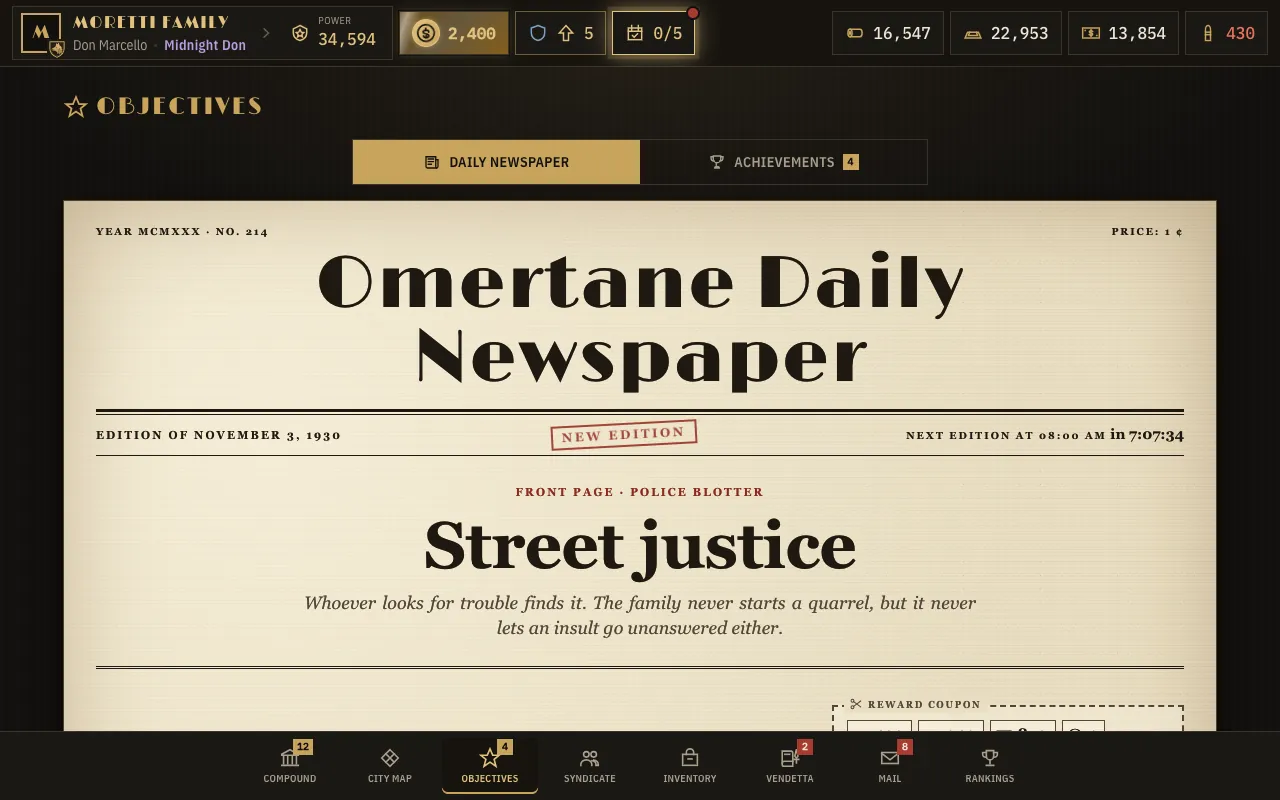
The Omertane Daily Newspaper comes out every day at 08:00 game time, with 4–6 missions picked for you and written as articles: gathering trips, defeated rackets, finished constructions, trained troops, research, healed wounded, marches with a Capo. Targets grow with the Villa’s level. The reward comes in resources, often an item too, sometimes gold, and finishing all of them earns a bonus: a Capo box or a large speeder, plus 3 gold. At 08:00 the old edition disappears, along with anything you did not claim. Below the missions, a City news section tells what the whole city did in the last 24 hours: rackets seized or contested, the top raider, the war leader, federal transits hijacked, wrecked or delivered, new pacts, vendettas and new syndicates. It refreshes about every minute and shows only public information, never resources, coordinates or spy information.
Weekly check-in
The calendar icon in the top bar shows your login streak. Collect one reward a day for five days in a row: production of each resource and speeders on days 1 and 2, gold, a research speeder and a production booster on day 3, a resource pack and speeders on day 4, and on day 5 25 gold, a Capo box, a research speeder and ammunition. Miss a day and the streak restarts at day 1; the calendar resets every Monday at 00:00 game time.
The office phone
Once you have the Switchboard (Villa level 5), a phone rings every hour on the hour, game time, while you are connected. An informant offers you a job and leaves two choices, each with its own cost and risk. You can send the boys after a whisky truck, with good odds of a haul and a risk of an ambush, or you can let it go. The call rings for 5 minutes, then it is lost until the next hour. You find it in the Phone tab of the Switchboard.
Achievements
29 achievements for the long road: buildings reaching level 20, the Villa at 15 and at 20, power of 10,000, 50,000 and 200,000, a million resources gathered, ten Capos, ten thousand war points. They give plenty of gold, Capo boxes and 7-day shields.
Rewards do not arrive on their own: you press Claim when an objective is complete, and what you get is added on the spot.
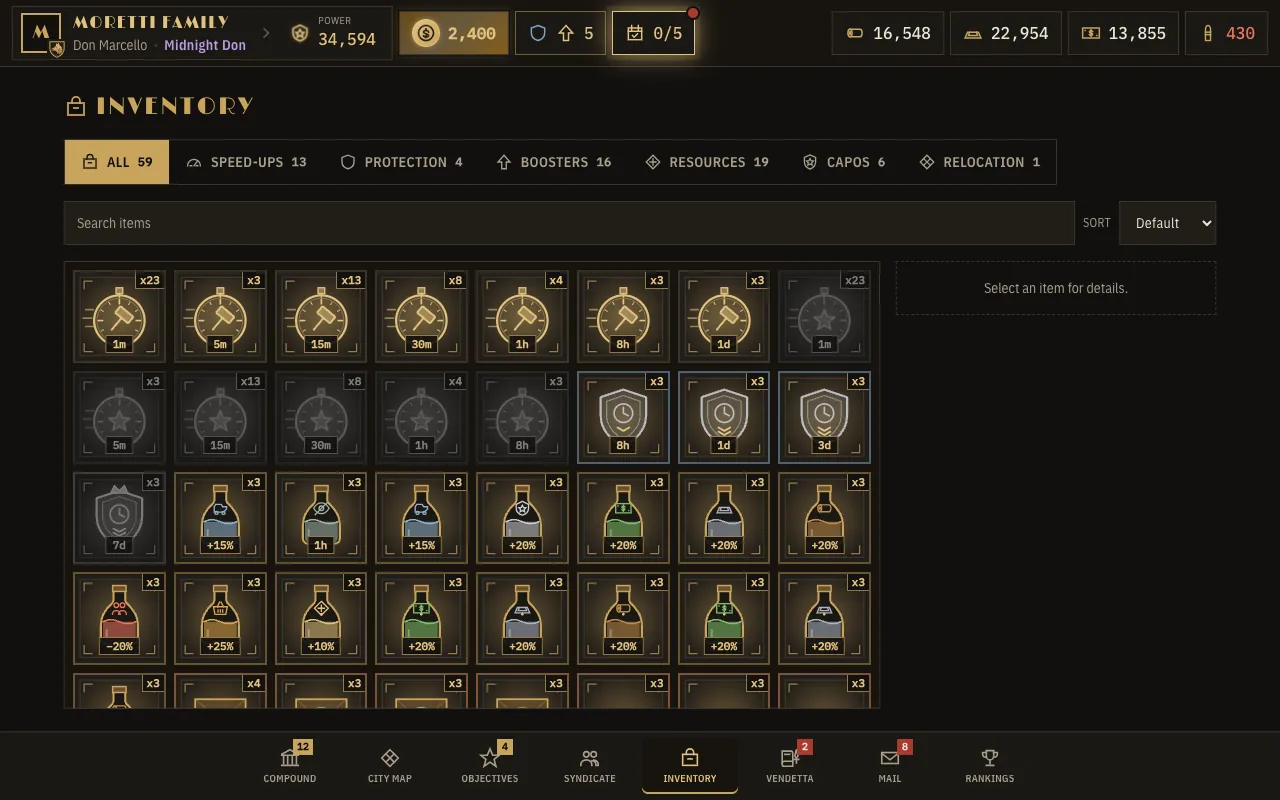
The inventory
Items pile up in the Inventory and you use them when you need them. The game warns you if a speeder would be longer than the time left.
Protection shields
8 hours, 1 day, 3 days or 7 days. They stack on top of the current shield, up to 7 days.
Resource packs
500, 1,000, 2,000 or 5,000 of wood, iron and cash at once, or of a single resource. They cannot be used if they would exceed your depot capacity.
Capo boxes
Mostly fragments of a Capo you do not own yet (a quarter to half of what the Capo needs), with a 5% chance of a whole Capo. The rarity follows roughly 66% Common, 24% Rare, 8% Epic and 2% Legendary. A Capo you already own never comes up.
Speeders
They cut the time of a construction (up to 24 hours), a research or a training (up to 8 hours).
Speed up any order
You do not have to hunt through the Inventory: every running construction, research and training has a Speed up button. It opens a dialog with the time left and the matching speeders you own. The game marks the best fit as Recommended and warns you if part of the time would be wasted, so you can still choose to use it anyway. Orders that have not started yet cannot be sped up. Every inventory item has its own artwork: shields, resource packs, boosters, speeders and Capo boxes.
Syndicates
Families that stick together
A syndicate lets you cooperate with other families in the city. It is optional, but a city is easier to hold with more people.
How to found one
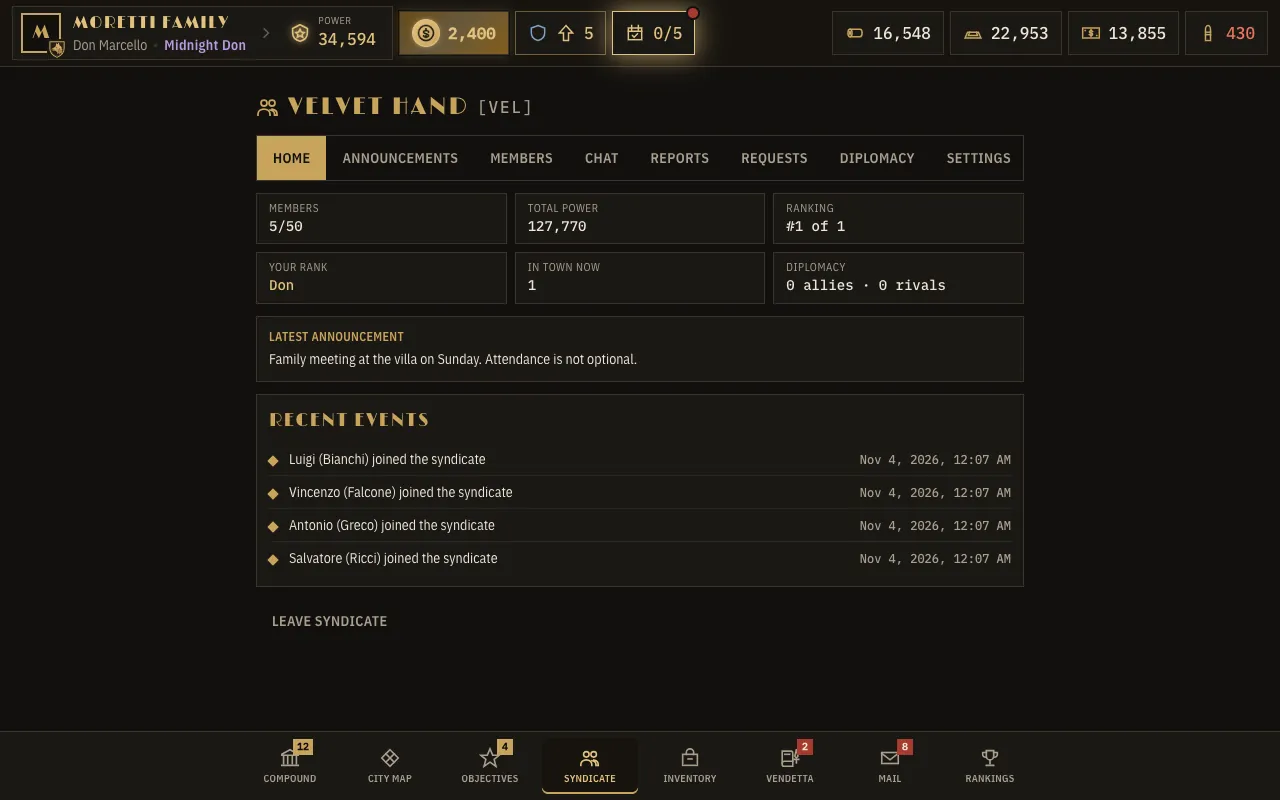
First you build the Syndicate hall (Villa level 4), without which you can neither found, join nor apply to a syndicate. Then you found it from the Syndicate tab, with a name of 3–30 characters and a tag of exactly 3 letters or digits, shown as [TAG], for 1,000 gold. It can hold up to 50 families. The Don chooses who can join: anyone with enough power joins directly, or a join request is required. The Don also sets a minimum power. A player who is invited by the Don skips both rules. A player can apply to several syndicates at once and cancel a request at any time; the Don or a Consigliere accepts or declines it, and the first syndicate to accept cancels the other requests. The home page of a syndicate shows its member count, total power, its place in the syndicate ranking and the last 15 events (joins, departures, removals and rank changes). The name and tag are permanent: once the syndicate is founded they can never be changed.
The Syndicate hall
Without it you can neither found, join nor apply to a syndicate. Each level enlarges the reinforcements you send by 4% troops and speeds them up by 2%.
Ranks
Don (the leader), Consigliere (at most one), Underboss (at most three), Capo and Soldier. Only the Don changes ranks and the join settings; the Don and the Consigliere handle join requests. If the leader leaves, leadership passes to another member, and the syndicate disbands when the last one leaves.
Chat and announcements
Every syndicate has a shared chat (messages up to 500 characters, with an unread counter) and an announcement board only the Don and the Consiglieri can write on. You can ask for help straight from the attack alarm, with your compound’s coordinates.
Reports
The Reports tab shows what the members are doing: who attacked whom and with what result, who took which racket and who was attacked. Every member can see it, and the syndicate keeps the last 100 events.
Reinforcements
Members of a syndicate cannot attack each other. Instead, they can send troops by convoy to defend one another’s compounds. The troops stay there until recalled by whoever sent them or by the host.
Diplomacy
The leader can propose alliances, which have to be accepted, or declare rivalries with other syndicates. On the map, your syndicate, your allies and your rivals have different colours, so you see at a glance who is who.
The city underworld
Gambling, vendettas and the black market
Beyond buildings and convoys the city has an underworld: a clandestine club, boosters, a ledger of vendettas, a shop that asks no questions and a balance between respect and terror.

The underground club
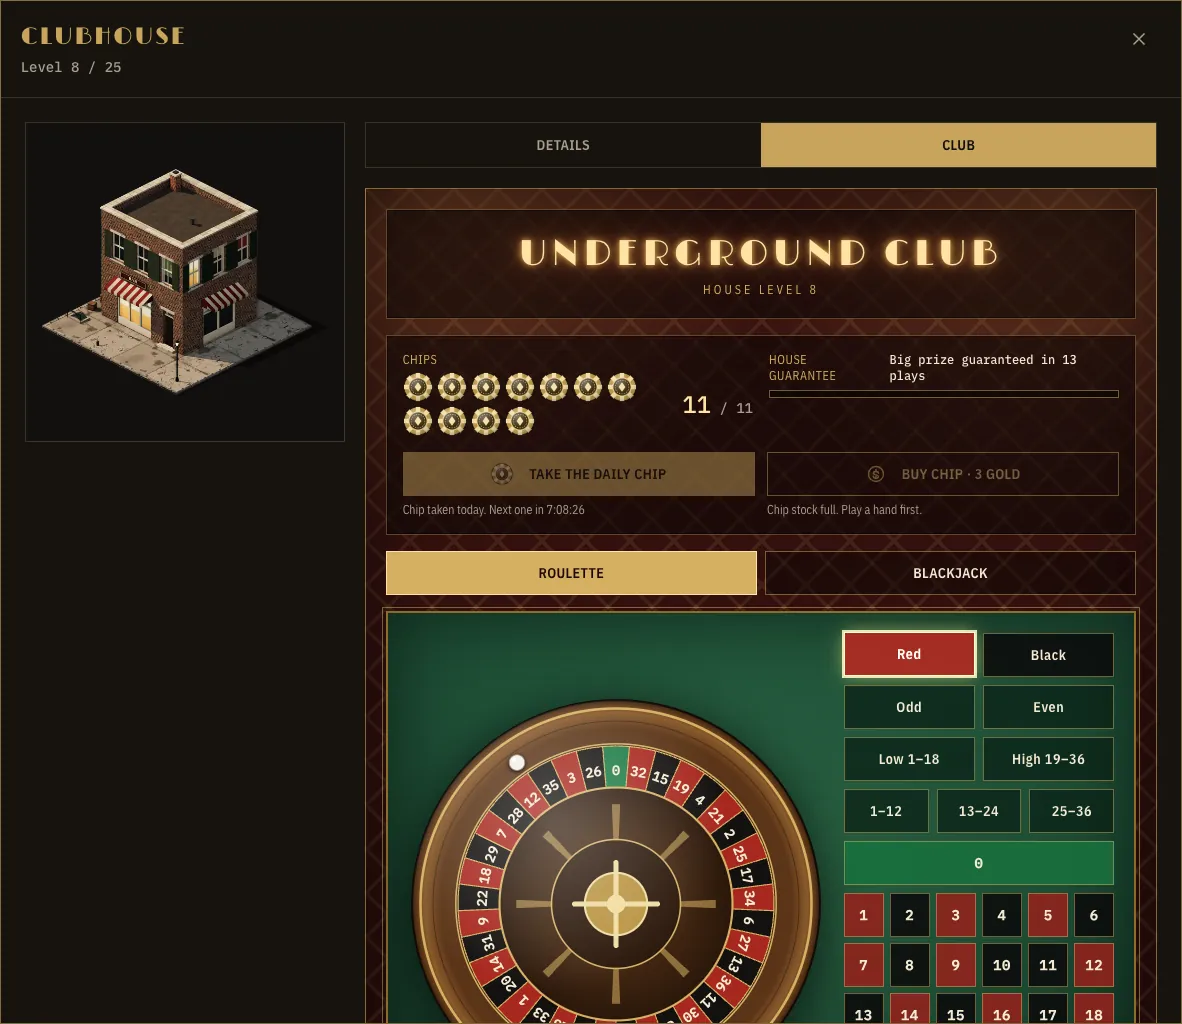
In the Club tab of the Clubhouse (from level 2) you play European roulette, and from level 5 blackjack against the house. Every play costs one chip: you get one free chip per day (renewed at 08:00) and can buy more with gold, 3 gold each, at most 9 a day. Your chip stock grows with the Clubhouse’s level. Prizes are boosters, ammunition, shields, XP books for Capos, gold or Capo boxes, and after 12 plays without a big prize the next one is guaranteed.
The Vendetta Ledger
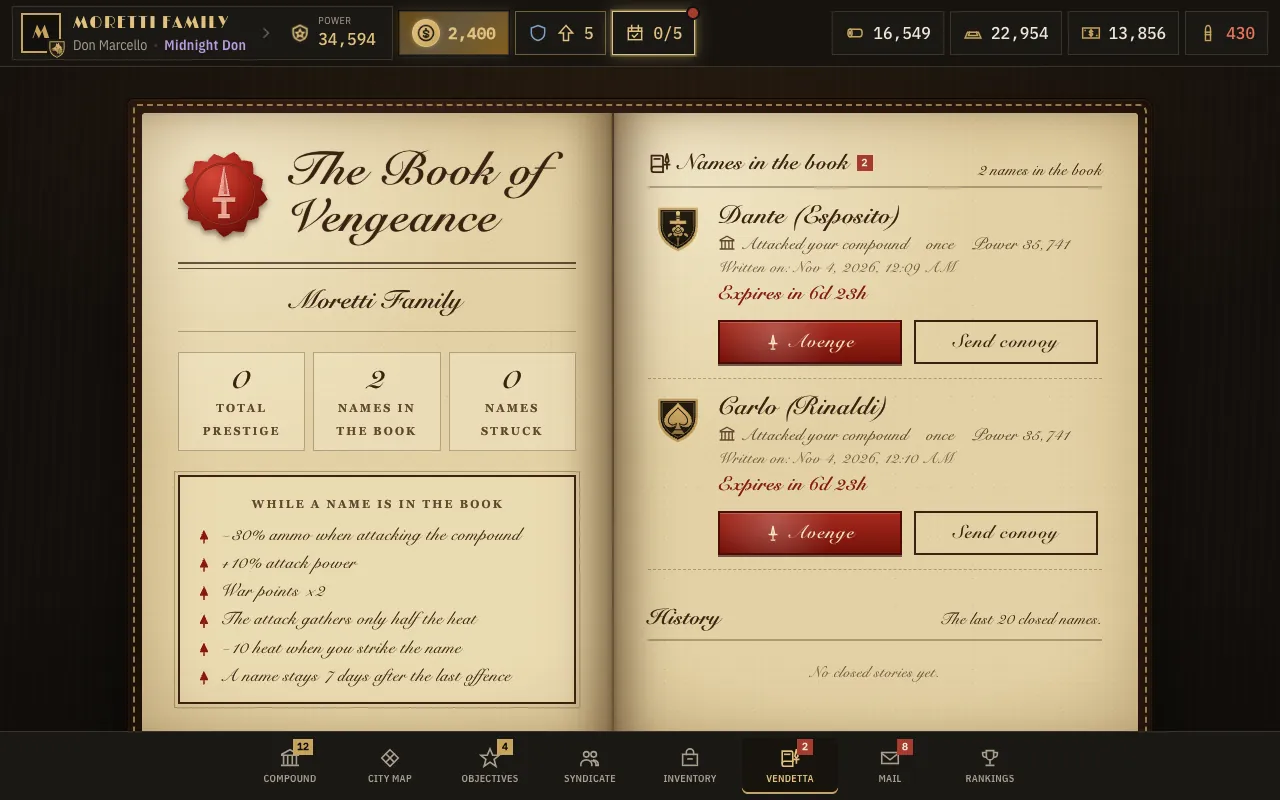
When someone attacks your compound or a racket you hold, their name goes into your ledger for 7 days. While the name is active your attacks on them cost 30% less ammunition, hit 10% harder, earn double war points and heat the police by half. You strike a name by destroying at least half of their home army or taking a racket from them: you get cash, 2 gold and prestige, which has its own ranking. The same pair can pay the reward once every 24 hours.
The Black Market
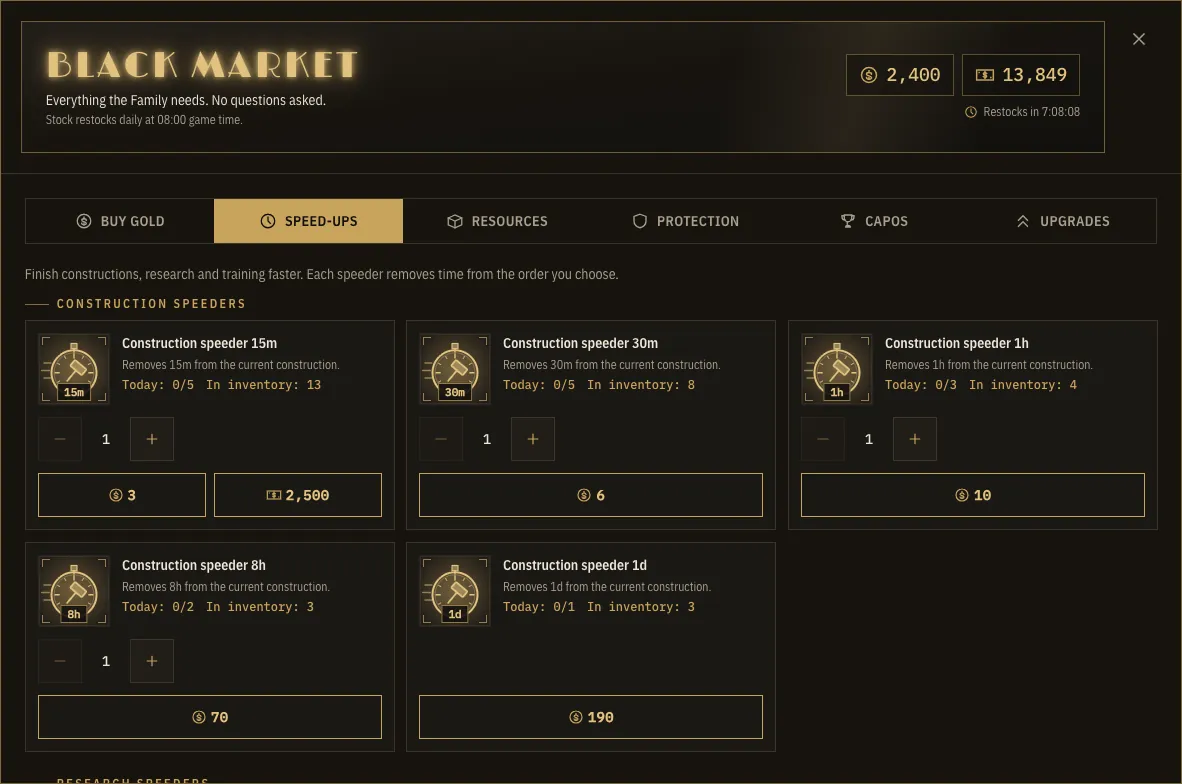
A fixed shop in the compound, open to anyone, with an animated window and six tabs. Speed-ups (construction, training and research speeders), Resources (packs and ammunition), Protection (shields, boosters and a relocation pass), Capos (Capo boxes, experience books and fragments) and Upgrades (the second construction, research and training queue places). Offers are paid in gold or, for the cheaper ones, cash, and have daily limits that renew at 08:00. Fragments you already hold make a whole Capo cheaper. The Buy gold tab shows the future gold packages as a preview marked “Coming soon”: no real-money payment exists yet.
Boosters
Inventory items won in the club, from the paper or bought at the Black Market, giving a temporary edge: +20% production of one resource (4, 12 or 24 hours) or +10% of all, +25% gathering (4 hours), +15% march speed (for the next mission or 4 hours), +20% defence (4 hours), 20% faster training (4 hours) and a one-hour counter-surveillance retainer that sends enemy spies home empty-handed. Using the same booster again extends it up to 24 hours, and different kinds stack.
Respect or Terror
Every family has a lean between −100 (Terror) and +100 (Respect). Gathering at home, reinforcing allies and bribing push you towards Respect; attacking players, night raids and the heavy losses you cause push you towards Terror. At the maximum, Respect gives +12% production, faster healing and +10% to Brawlers. Terror gives +10% attack to Gunmen and Tommy gunners and 15% more loot in convoys, but also 25% more police heat.
The living city
A city that moves even without you
On top of the basic rules the city keeps its own rhythm: armoured trucks passing by, neighbourhood feasts, a city with edges and a clock that measures how long you really play.
The armoured Federal Transit
Every day between 12:00 and 18:00 (game time) between 3 and 8 armoured trucks set out in each sector, one after the other, each on a drive of about an hour to a Central Bank. Banks and routes are spread out, at least 3 neighbourhoods apart. You send a convoy led by a Capo to an intersection of the route and hit the truck while it stops there. The guard is shared by every family and whatever fell does not come back. You can hit the same truck at most twice, with no ammunition, but every strike adds 15% Heat. Whoever lands the final blow takes what is left of the cargo; the others get a share proportional to the damage and a chest of speeders and Capo fragments, richer the more of the guard you brought down. Families in the neighbourhoods it crosses are warned 15 minutes ahead. The cargo of each truck (from 150,000 to 350,000 cash) and the strength of its guard are drawn fresh every day: the richer the truck, the tougher its guard. Every sector has its own Transit, with its own trucks, banks, guard and cargo, running at the same time as the others: only the families of a sector can see and hit its trucks, even if the neighbouring sector is within reach.
The Tribute Pact
If a neighbour from the same neighbourhood, with at least 1.5 times your power, has attacked you more than 3 times in the last 7 days, you can offer them a Tribute Pact from the Don’s villa. If they accept, for 24 hours 5% of your passive wood, iron and cash production goes to them and they can no longer attack you. An aggressor can have at most 3 active pacts. Either side can break the pact, but whoever does marches 20% slower for 6 hours.
The Family Scrapbook
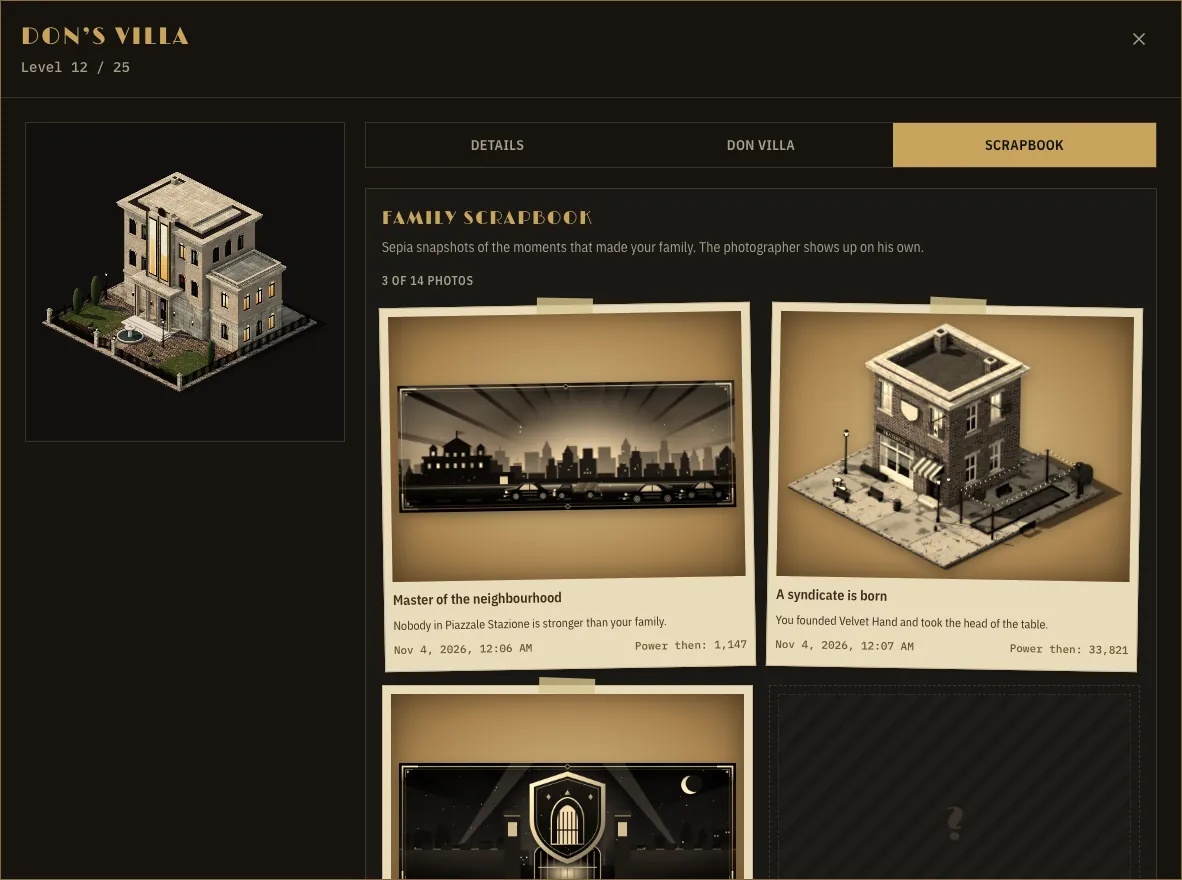
In the Don’s villa there is a Scrapbook tab, a photo album that fills itself. At the key moments of your empire, the first racket you capture, the villa reaching levels 5, 10, 15, 20 and 25 (and changing its look), the first armoured convoy out of the Garage, the first time you become Neighbourhood Master, your first raid won and first defence held, founding or joining a syndicate, your first plate at the Street Feast and your first new Capo, the game takes a sepia snapshot with the date and your power at that moment. Moments you have not reached yet wait as empty frames.
The Street Feast
Every day at 18:00 (game time) the city itself throws the Feast, and it lasts until midnight, right after the Federal Transit. Nobody starts it: the server picks at most five inhabited neighbourhoods, one in the centre of the map and one in each of the north, south, east and west, so there is always one within reach, and no two are closer than 3 neighbourhoods. They are chosen at random and never the same ones two days in a row. For six hours the families living there cannot attack each other, all of them produce 15% more, and a big depot appears in the central square. The depot is open to every family of the sector, not only the neighbours, and families of other sectors cannot use it: every sector has its own feasts, started at the same time but completely separate. You find the active feasts of your sector on the minimap and the city map, and send a convoy with no fight and no losses. Every family can send at most two convoys and take at most what 1,000 men could carry, at 6 wood, 4 iron and 10 cash per man. Whatever is left disappears at midnight. Nothing is mailed when a feast starts or ends.
The Don’s Jubilee
Once a year your compound celebrates for 24 hours without you lifting a finger. It starts the first time you enter the game after the anniversary of the day you created your account, so you do not have to be online on the exact day: if the anniversary is today and you come back the day after tomorrow, the party starts then. For the first 12 hours a golden festive shield protects it, and attacks cannot cancel it, not even the ones you send yourself. For the whole 24 hours every building produces 30% more. The city map shows the shield as a golden force-field cube around the compound.
A city with edges
Each sector is a large square of neighbourhoods. When the open sectors are nearly full a new one opens next to them, and beyond the edge there is the sea. Families that found or move into a freshly opened sector get +25% production for 30 days. You can move to a free place up to 100 tiles from your compound (horizontal plus vertical distance), at least 24 hours after your last move, but every move uses up one Forged passport from the inventory: you get 2 at the start and can buy more at the Black Market for 20 gold each, one a day. The daily Federal Transit and Street Feast run in every sector separately: each sector has its own trucks and feasts, and you only take part in those of your own sector.
Inactive families
A family that nobody has entered for 365 days is deleted, so the city does not fill up with empty compounds. You get warning emails after 300, 335 and 358 days, and entering the game at any moment keeps the family. Your account stays: your gold, your extra queue places and the compound customisation you bought are kept and given back when you found a new family. Everything else is lost.
Active time and notifications
Your profile shows how long you have really played: today, this week and in total. Only the time when the tab is visible and you interact with the game counts, in real time, and only you see it. In the game, badges guide you: gold ones show what you can claim or use, red ones what asks for a decision or is urgent, always with a number. The numbers game never gets a badge. Game settings, opened from your profile, show a Server status panel with your latency, the connection quality, whether the real-time link is up and the game time.
Your family
The name, the crest, the face
When you found your family you christen your family and pick a crest out of twelve, drawn in golden lines. The crest shows on the villa, on your compound on the map and on convoy flags. You set your profile picture once, on the website, and it follows you into the game.
A family name is 3 to 10 characters long and must be unique in the city. The game shows it followed by “Family”.
Family crests
 Badge
 Crossed pistols
 Wolf
 Signet ring
 Rose and dagger
 Fedora
 Lion
 Eagle
 Tommy gun
 Ace of spades
 Crowned knife
 Olive branch
Make it yours
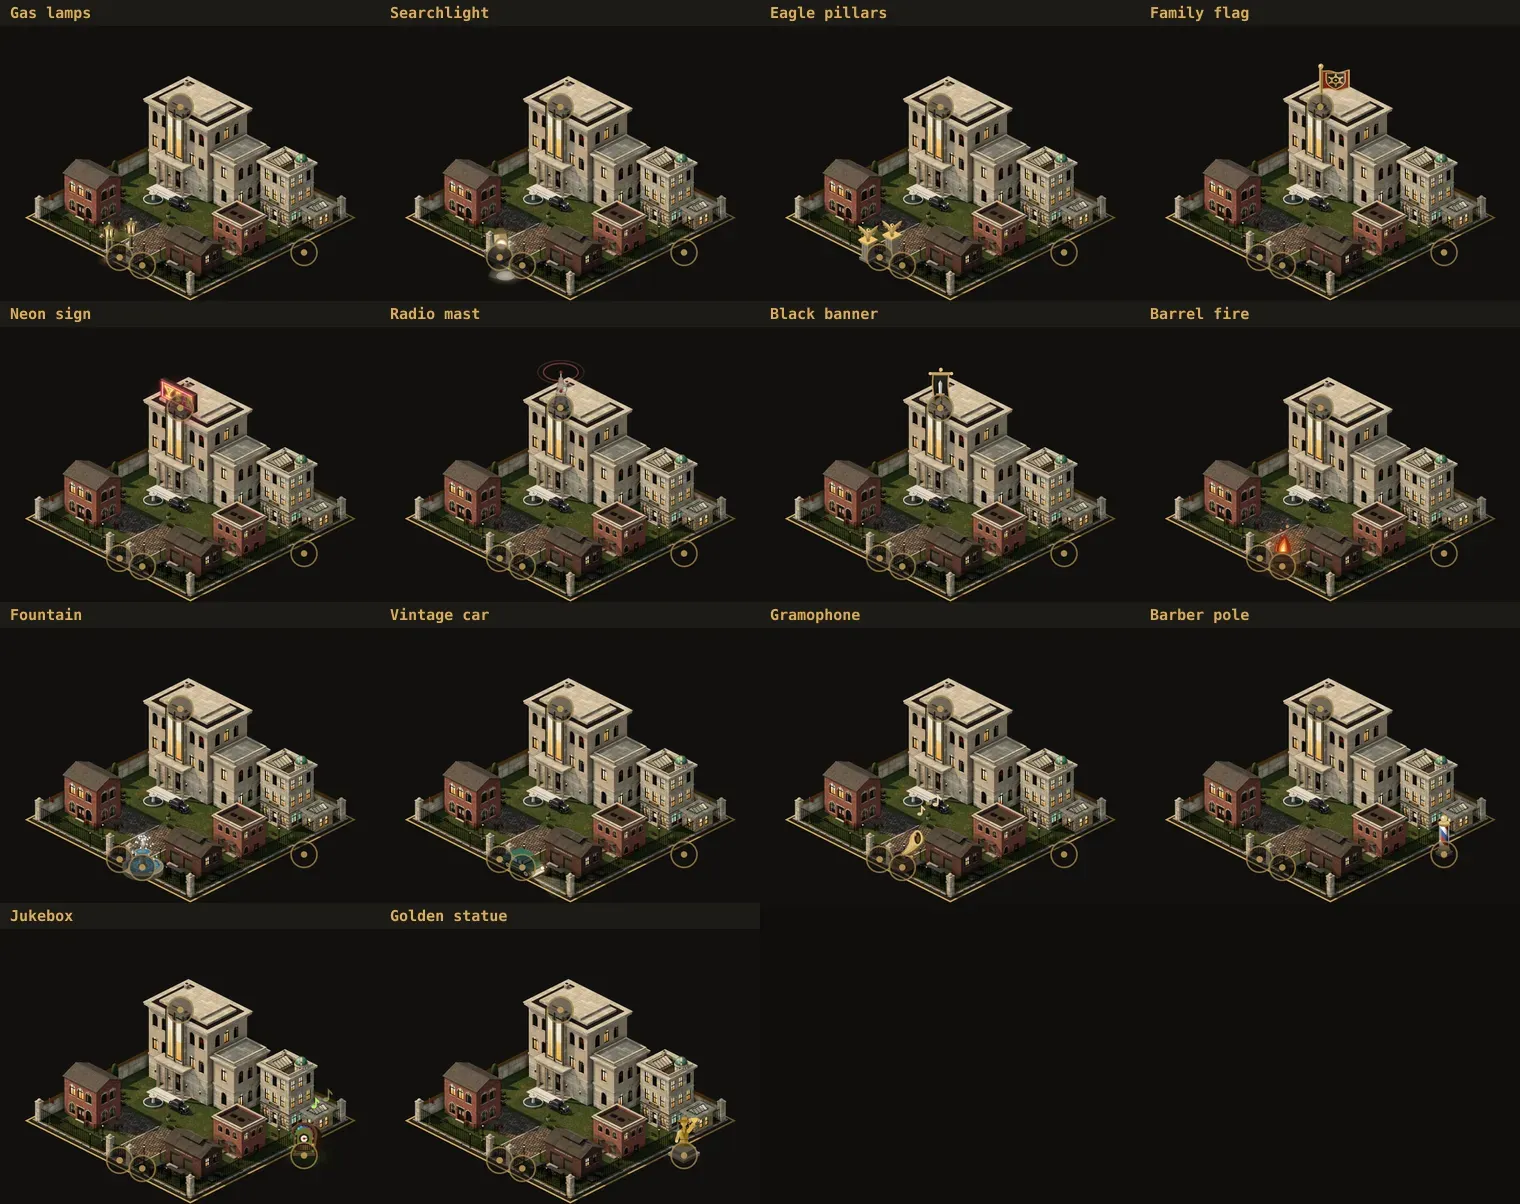
Trophies, titles and decorations are pure cosmetics: they give your family an identity and never any power, production, defence or speed. Open them from Customize on the Compound screen.
Titles
24 titles in four rarities, shown under your name on your profile, in the top bar and on the map panel of your compound. Some are free, some come with an achievement or a trophy, and five are bought with gold, once and for good.
Trophies
14 trophies are earned on their own the first time you win fights, hold rackets, avenge yourself, join the feasts and transits, gather Capos, or grow your power and your fortune. Pin up to six on your profile showcase.
Decorations
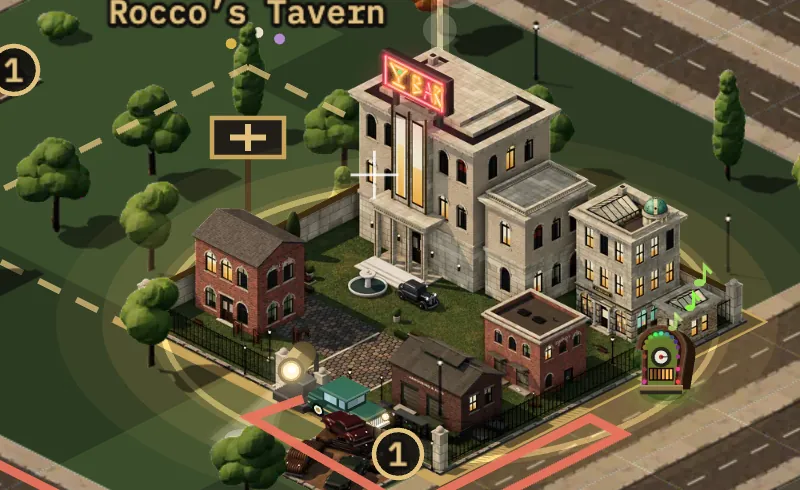
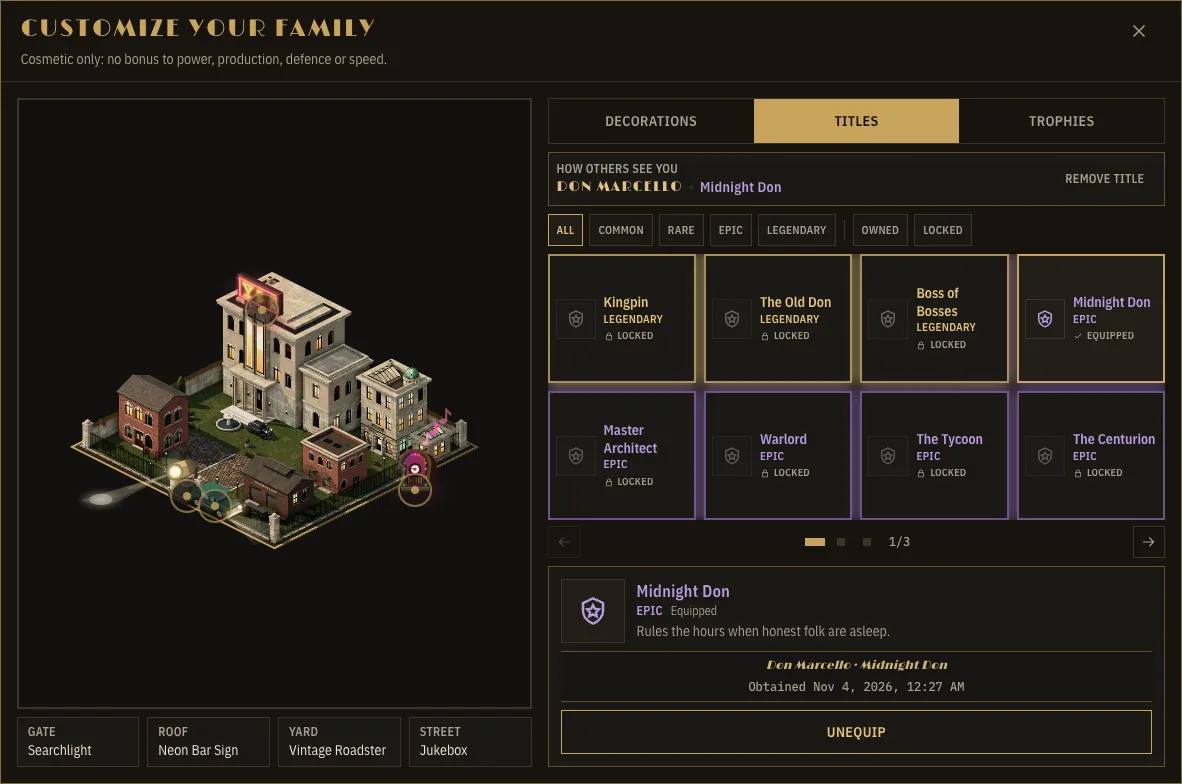
14 animated decorations for four fixed places: the gate, the roof, the yard and the street. Place one in each slot and every player sees them around your compound on the city map. Free, trophy and gold ones, bought once and kept.
Glossary
A small dictionary of the city
The words you will hear most often, in short.
- Compound
- Your private base: the villa, the buildings and the wall. It is never destroyed or conquered.
- Capo
- A lieutenant with a name and talents. No convoy leaves without one.
- Don
- You: the head of the family.
- Convoy
- A group of troops marching on the city streets: gather, attack or reinforce.
- Racket
- A local gang business. Beat it and you occupy it for 2 hours, with income every minute.
- Resource point
- A place on the map where convoys take wood, iron or cash.
- Tier (T1–T5)
- A troop’s level: from plain T1 to elite T5.
- Shield
- A period in which the compound cannot be attacked. 7 days at most.
- Safehouse
- The share of your resources (10–50%) that attackers cannot steal.
- Heat
- How closely the police watch you, from 0 to 100%. At 100% a federal raid arrives.
- Respect / Terror
- The −100 to +100 scale that shows how you play and which perks you get.
- Booster
- An item with a temporary effect: production, gathering, march, defence, training or protection from spies.
- Neighbourhood Master
- The most powerful family in a neighbourhood, with +10% production while it holds the title.
- Ammo
- The ammunition spent on every attack, against players and rackets.
- Gold
- The family’s special currency, from the newspaper, achievements and the club. It is spent on a syndicate, extra queue places, club chips and the Black Market.
- Syndicate
- An alliance of up to 50 families, with a shared chat, ranks and reinforcements.
- Speeder
- An inventory item that shortens a construction, a research or a training.
- Queue place
- A place in the construction queue. You start with one (one building at a time) and can add a second for 500 gold; the extra order waits and starts by itself.
- Slot
- A place in the research or training queue. One order runs at a time; a second place holds the next order and costs 500 gold.
- Vendetta
- The ledger where whoever attacks you goes for 7 days: your revenge costs less.
- Capo fragment
- A piece of a Capo. Collect 10, 20, 40 or 80 (by rarity) to unlock them.
Need more?Read the FAQContact supportServer status
You have read the rules. Now go take the city.
An account, a family name and a villa are waiting. For a safe start, read Getting started too.